
There are a lot of weapons in Clair Obscur: Expedition 33, shared between six party members, with some of them having 20 weapons to choose from. Each weapon comes with different traits to differentiate them, as well as unique attribute scaling for every weapon. Some of these are difficult to find, while some are locked behind a side quest or inside a higher-level dungeon. Read on to find out every weapon for ![]() Gustave,
Gustave, ![]() Lune,
Lune, ![]() Maelle,
Maelle, ![]() Sciel,
Sciel, ![]() Verso, and
Verso, and ![]() Monoco, and where you can acquire them.
Monoco, and where you can acquire them.
There’s over 90+ weapons in Clair Obscur, with most of them having different traits.
Table of Contents
If you want to jump to a specific section, click on the links below.
| Quickjump |
|---|
| Upgrading Weapons |
| Gustave’s Weapons |
| Lune’s Weapons |
| Maelle’s Weapons |
| Sciel’s Weapons |
| Monoco’s Weapons |
| Verso’s Weapons |
Upgrading Weapons
Each weapon can be upgraded to a max level of 33, which changes the power of the weapon as well as its attribute scaling. At higher levels, this makes a massive difference in your overall power, so you won’t want to neglect leveling the weapons up. It’s worth noting that later on, you may find a weapon that you already have, and it will increase the level of the weapon substantially, especially in Act 3, where some weapons will gain 20+ levels. For a more in-depth guide on upgrading weapons, check out our Weapon Upgrade Guide, which will tell you how to upgrade your weapons and what catalysts you need for each level.
All Gustave Weapons
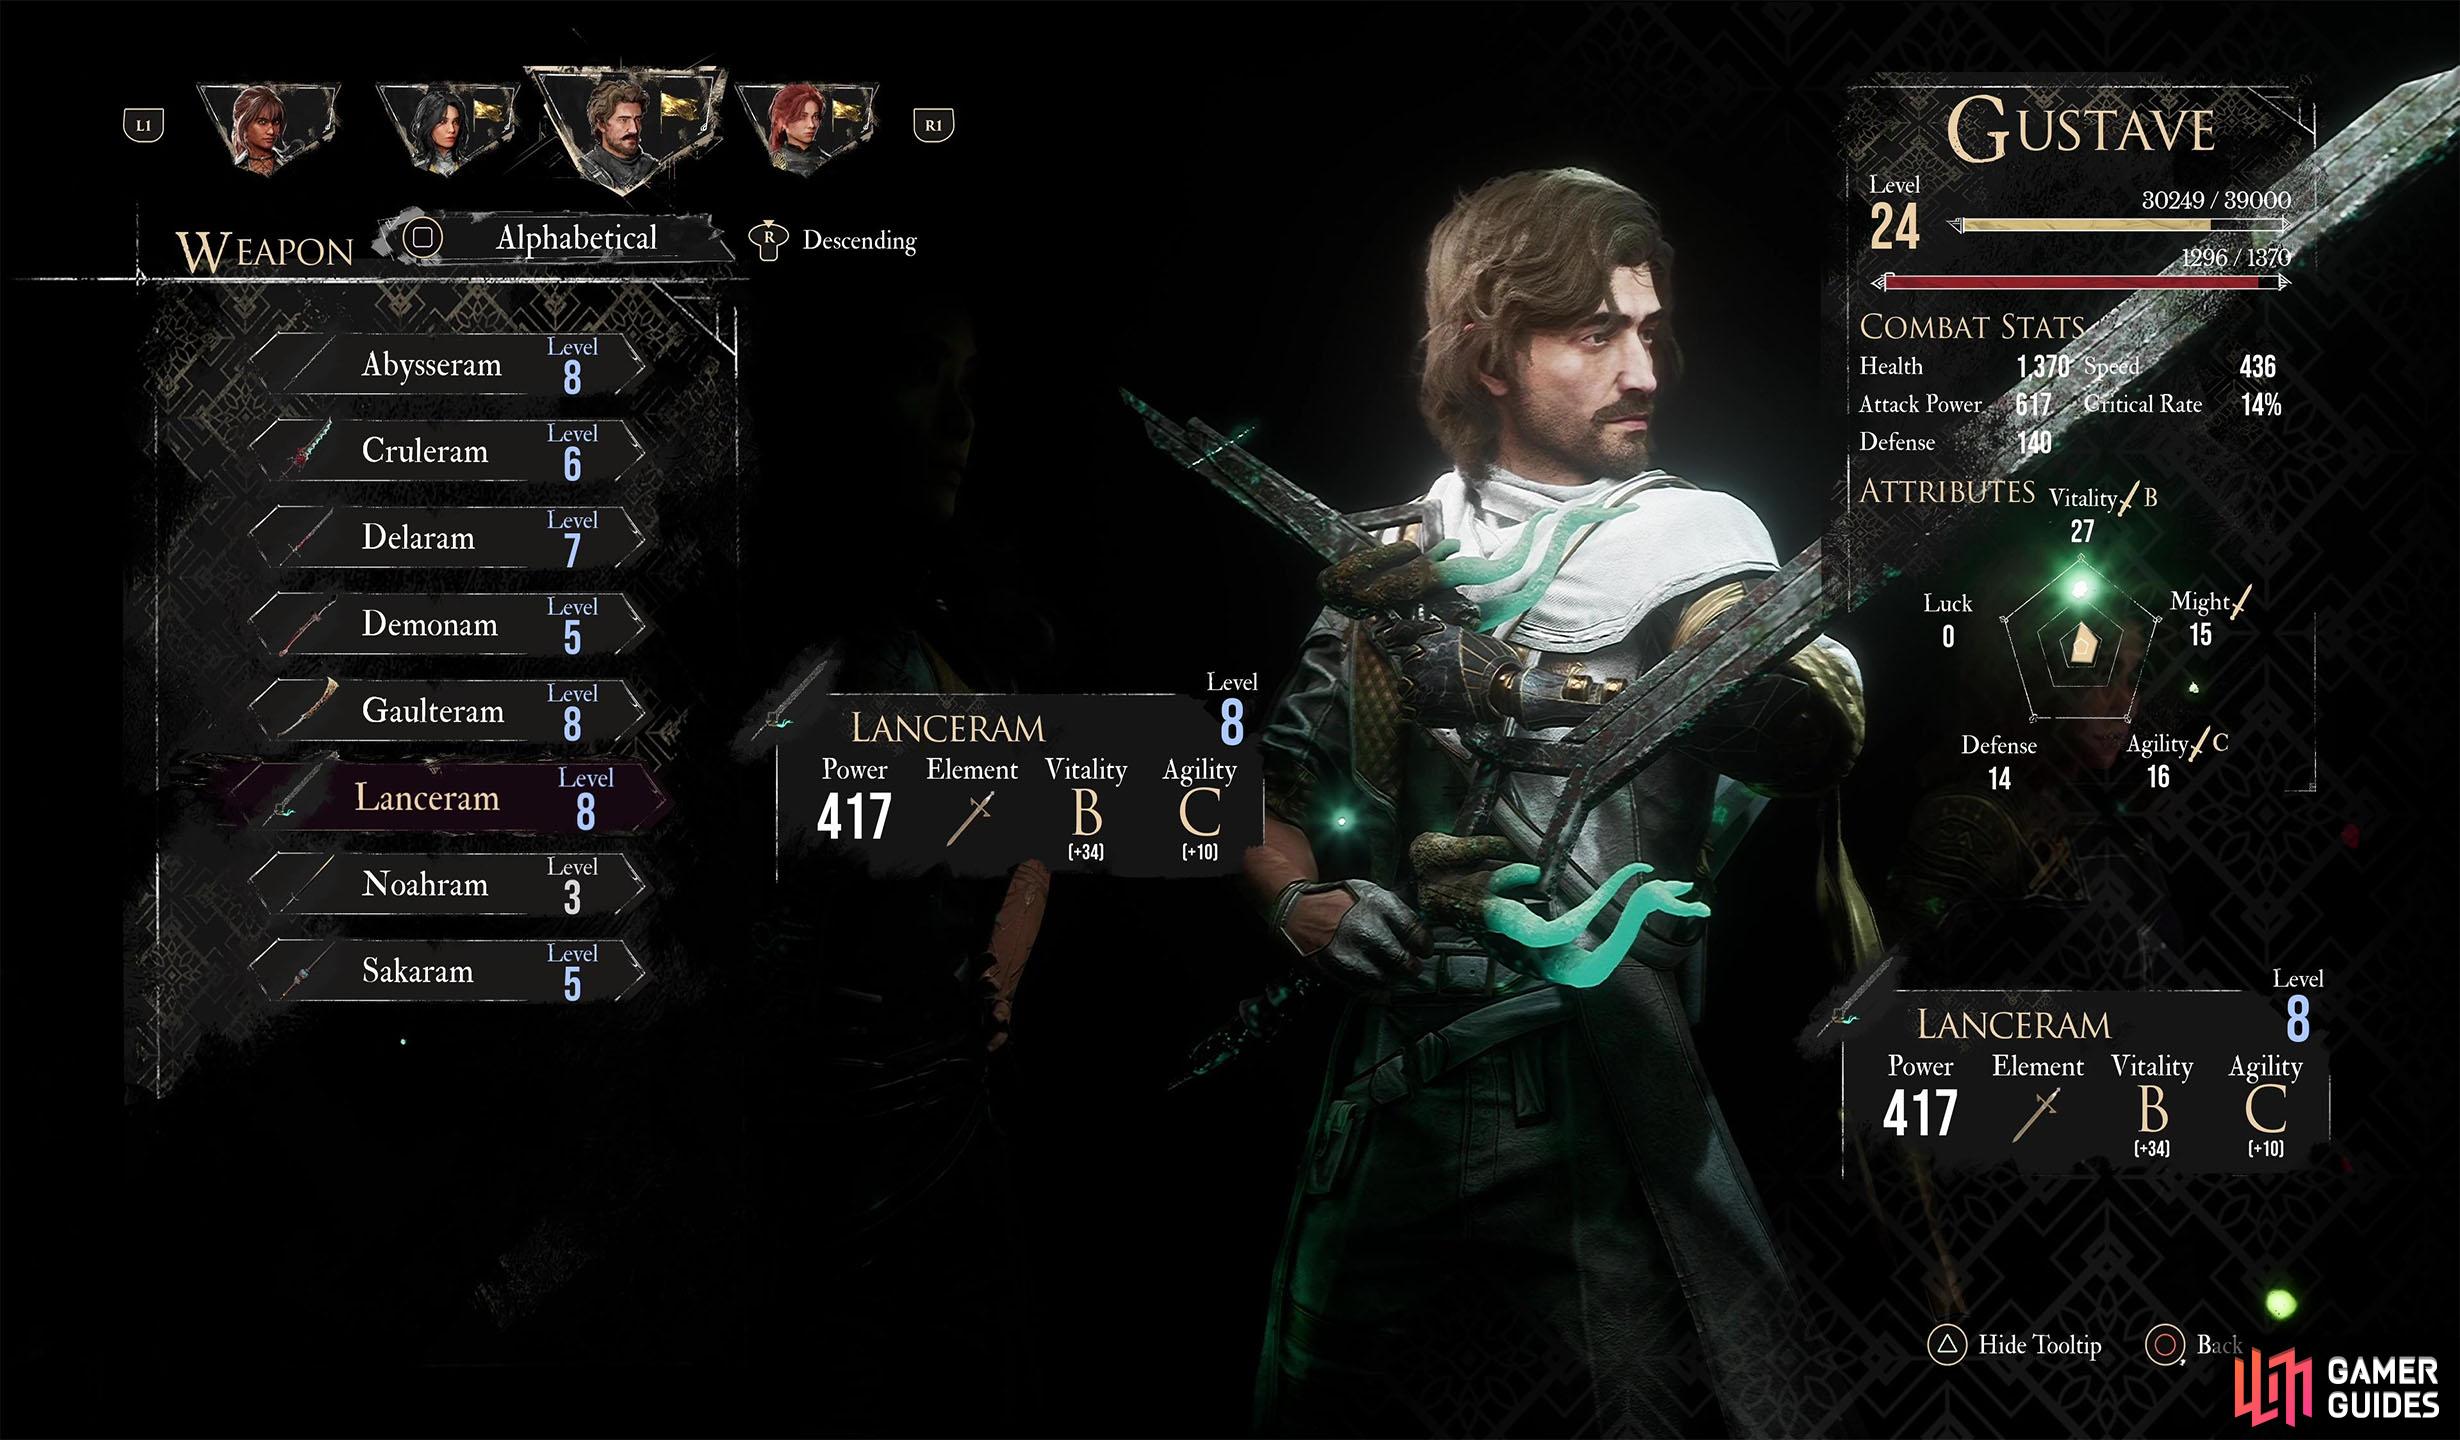
Gustave is the main protagonist of the game and wields a Sword and Pistol combo.
Gustave is one of the main protagonists of Clair Obscur: Expedition 33. His weapon of choice is a Sword and Pistol, which helps him build his ![]() Overcharge mechanic. Unlike the other party members, All Gustave’s weapons don’t have any traits.
Overcharge mechanic. Unlike the other party members, All Gustave’s weapons don’t have any traits.
| Weapon | Location | Effect Lv 4 | Effect Lv 10 | Effect Lv 20 |
|---|---|---|---|---|
| – | – | – | ||
| World Map - Beach east of |
– | – | – | |
| – | – | – | ||
| – | – | – | ||
| – | – | – | ||
| – | – | – | ||
| – | – | – | ||
| – | – | – | ||
| – | – | – | ||
| – | – | – | – | |
| – | – | – | – | |
| – | – | – | – | |
| – | – | – | ||
| – | – | – |
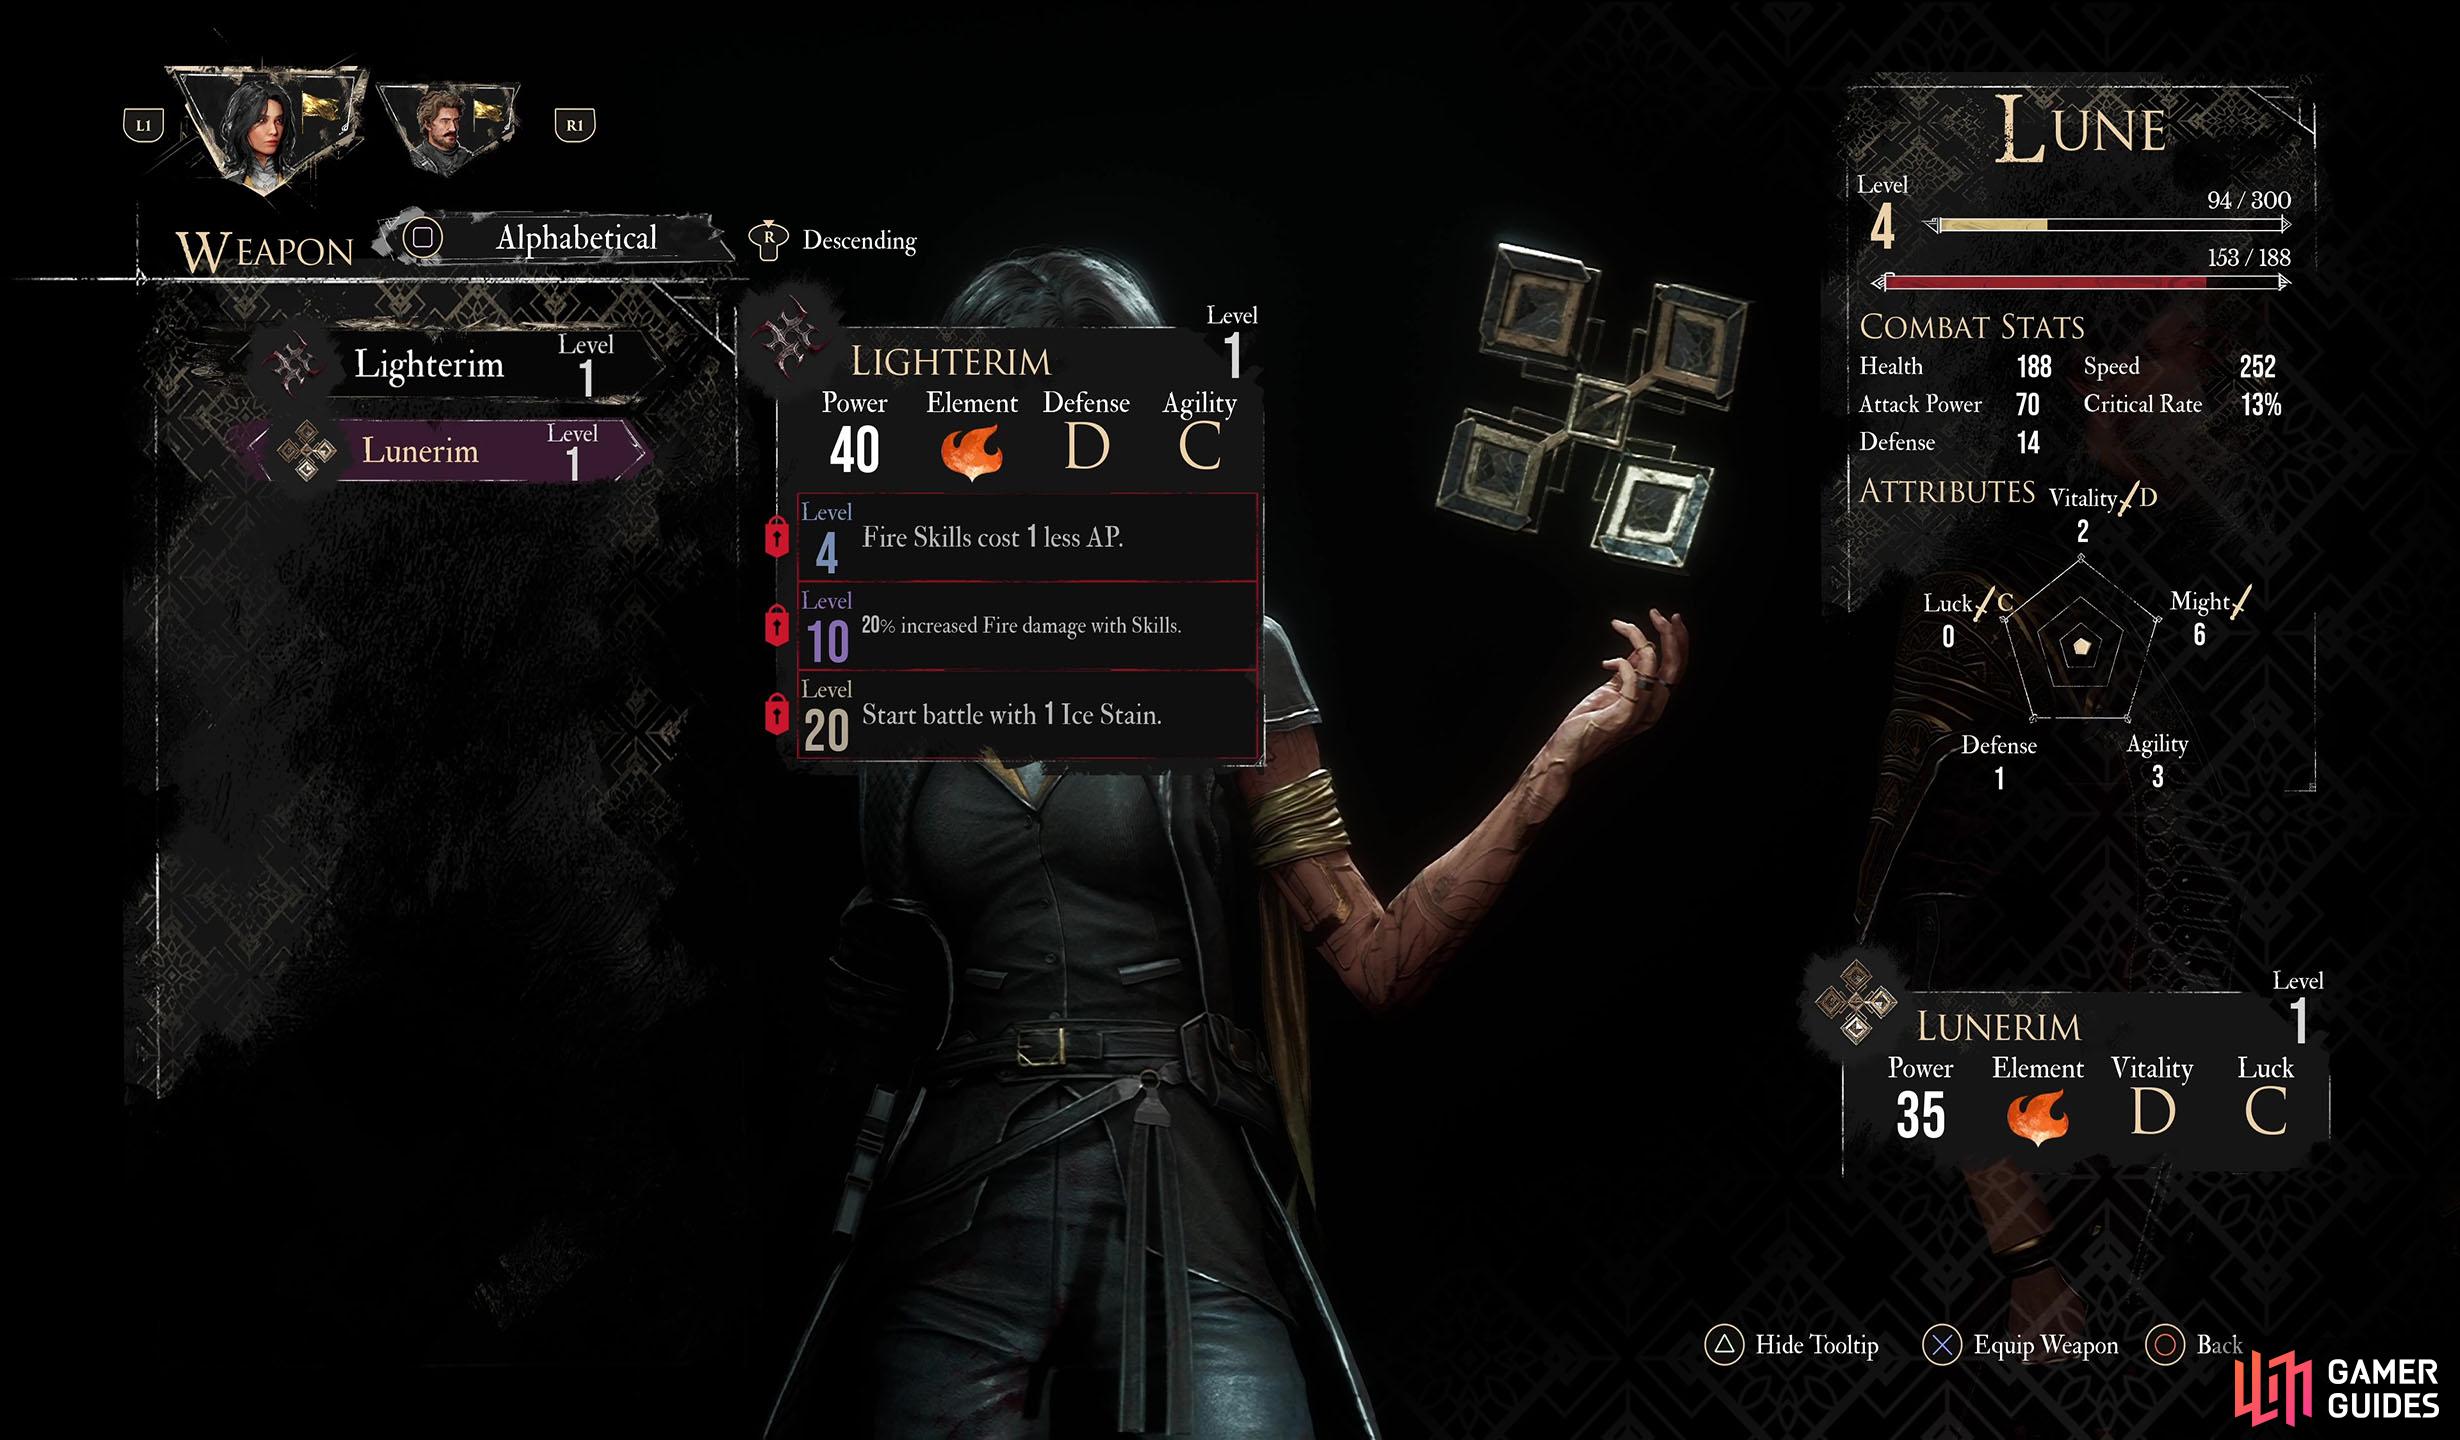
All Lune Weapons
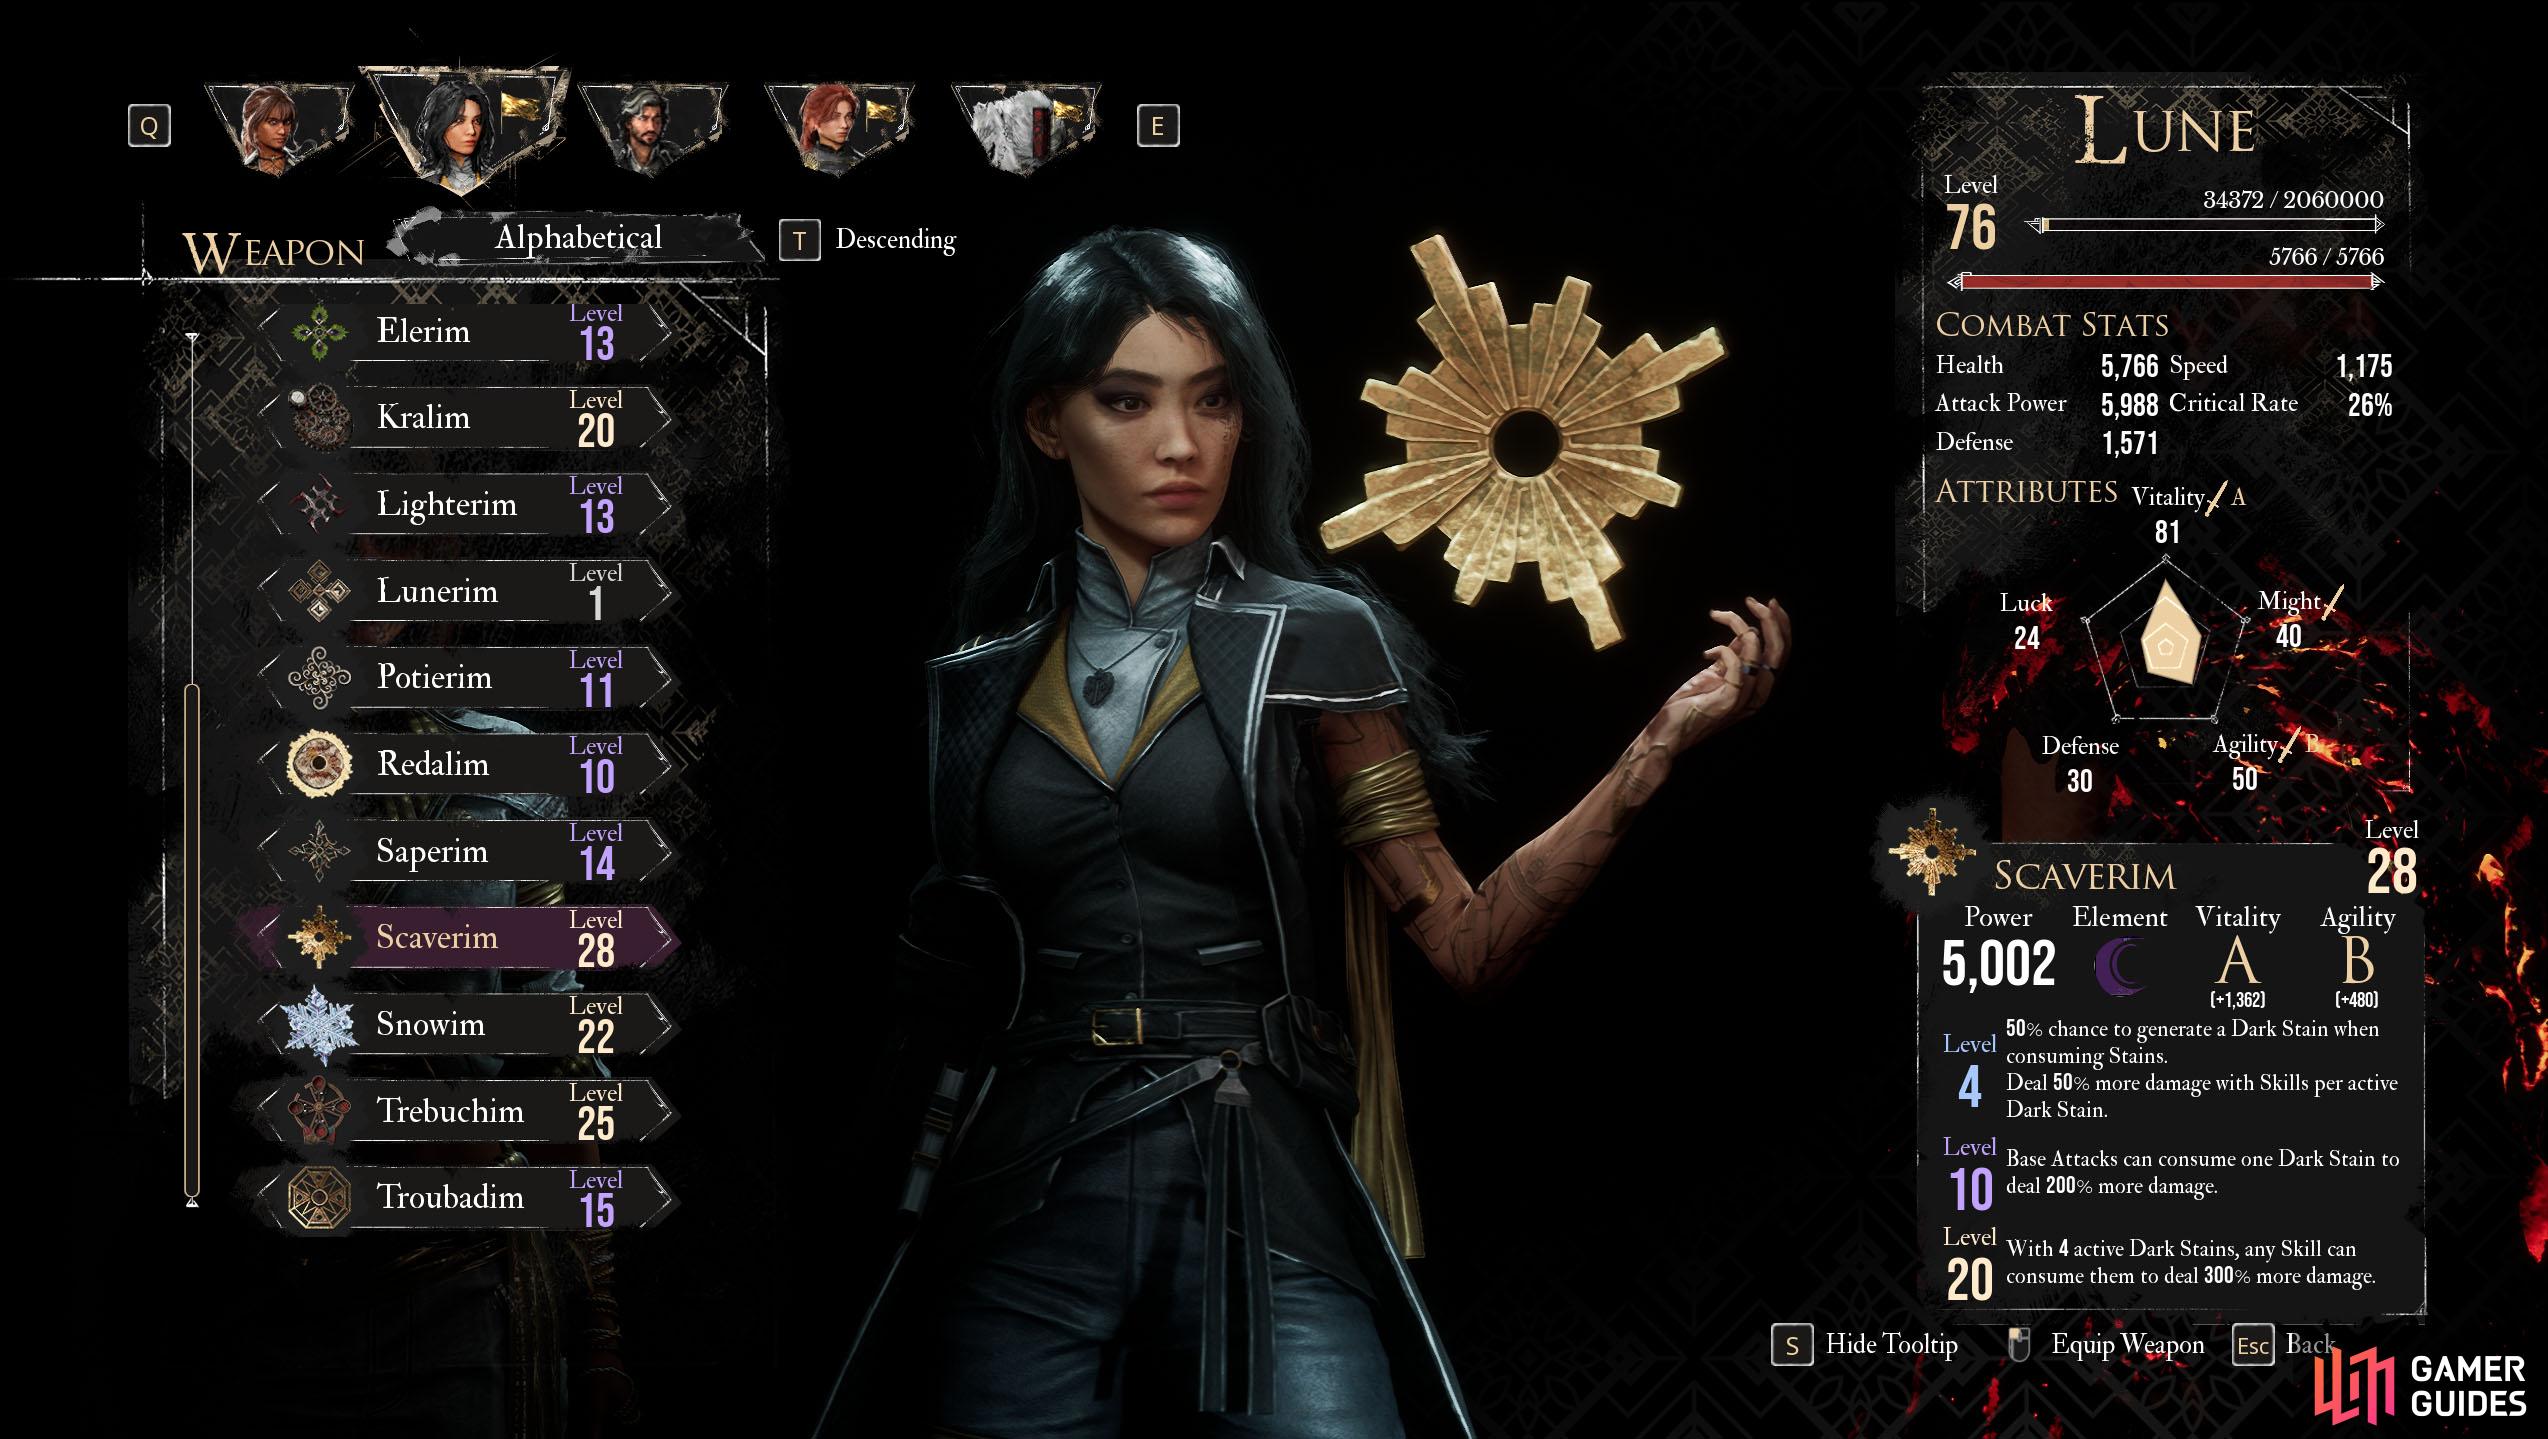
Lune generates stains through her canvas to fuel her powerful spells.
Lune will join Gustave early on in the first act bringing along some much-needed firepower. She is a master of the elements who uses a Canvas as a catalyst to unleash her powerful spells through the power of Stains.
| Weapon | Location | Effect Lv 4 | Effect Lv 10 | Effect Lv 20 |
|---|---|---|---|---|
| World Map - Floating Island north of |
Base Attack applies 2 Burn per Fire Stain | Generate one Fire Stain at the beginning of each turn | 30% increased Burn damage per Fire Stain | |
| Healing Skills cost 1 less AP | Generate one Earth Stain at the beginning of each turn | Replay instantly on consuming Stains with a Healing Skill | ||
| Using a Skill that consumes Stains increases damage by 20%. Can stack up to 5 times. Resets on using a Skill without consuming Stains | On turn start, if no Stains, 2 random Stains are generated | +1 AP when Stains are consumed | ||
| Inside the Monolith - |
30% increased Critical Chance per Ice Stain | +5% of a Gradient Charge on Critical hit | 20% increased Fire damage with Skills. | |
| 30% increased Break damage per Earth Stain | 30% increased Break damage per Earth Stain | Gain 9 AP on Breaking an enemy | ||
| Ice Skills cost 1 less AP | 20% increased Ice damage with Skills | Start battle with 1 Earth Stain | ||
| Lightning Skills cost 1 less AP | 20% increased Lightning damage with Skills | Start battle with 1 Fire Stain | ||
| Consuming an Earth Stain applies 1 Shield to self | 20% increased Earth damage with Skills | Base Attack generates an Earth Stain | ||
| Fire Skills cost 1 less AP | 20% increased Fire damage with Skills | Start battle with 1 Ice Stain | ||
| Default | – | – | – | |
| – | Earth Skills cost 1 less AP | 20% increased Earth damage with Skills | Start battle with 1 Lightning Stain | |
| Healing Skills generate one additional Light stain | Consuming a Light Stain applies Slow to a random enemy | Base Attack generates a Light Stain | ||
| Casting a Skill increases the Skill damage of all other elements by 20%.Resets when casting a Skill of a previous element | On turn start, if no Stains, 2 random Stains are generated | +1 AP when Stains are consumed | ||
| Inside the Monolith - |
50% chance to generate a Dark Stain when consuming Stains. Deal 50% more damage with Skills per active Dark Stain | +1 AP on consuming a Light Stain | Base Attacks can consume one Dark Stain to deal 200% more damage | |
| Healing Skills generate one additional Light stain | Generate one Ice Stain at the beginning of each turn | Replay instantly on consuming Stains with a Healing Skill | ||
| World Map - Northern beach near |
Using a Gradient Attack generates 1 additional Light Stain | When a Fire Stain is generated, a Lightning Stain is also generated. Once per turn | Gradient Attacks and Gradient Counters deal 50% more damage | |
| 50% chance to generate a Dark Stain when consuming Stains. Deal 50% more damage with Skills per active Dark Stain | Base Attacks can consume one Dark Stain to deal 200% more damage | With 4 active Dark Stains, any Skill can consume them to deal 300% more damage | ||
| 100% Critical Chance when 4 Stains are simultaneously active | 20% increased damage for each consecutive turn without taking damage. Can stack up to 5 times | Critical hits apply Burn | ||
| World Map - Beach west of |
50% chance to generate a Light Stain when consuming Stains | +1 AP on consuming a Light Stain | 20% increased damage with Skills per active Light Stain | |
| Freeze self when falling below 30% health. Prevent the next instance of damage while Frozen | On turn start, if Frozen, remove Freeze and recover 60% Health | Gain 2 Ice Stains and 3 AP when Frozen | ||
| Generate a random Stain on Free Aim shot | +1 AP when Stains are consumed | Base Attack generates 2 random Stains | ||
| On Defensive Stance, gain 1 Shield per Parry. Lose all Shields on turn start | 20% increased Light damage with Skills | 50% increased Counter damage per Shield |
All Maelle Weapons
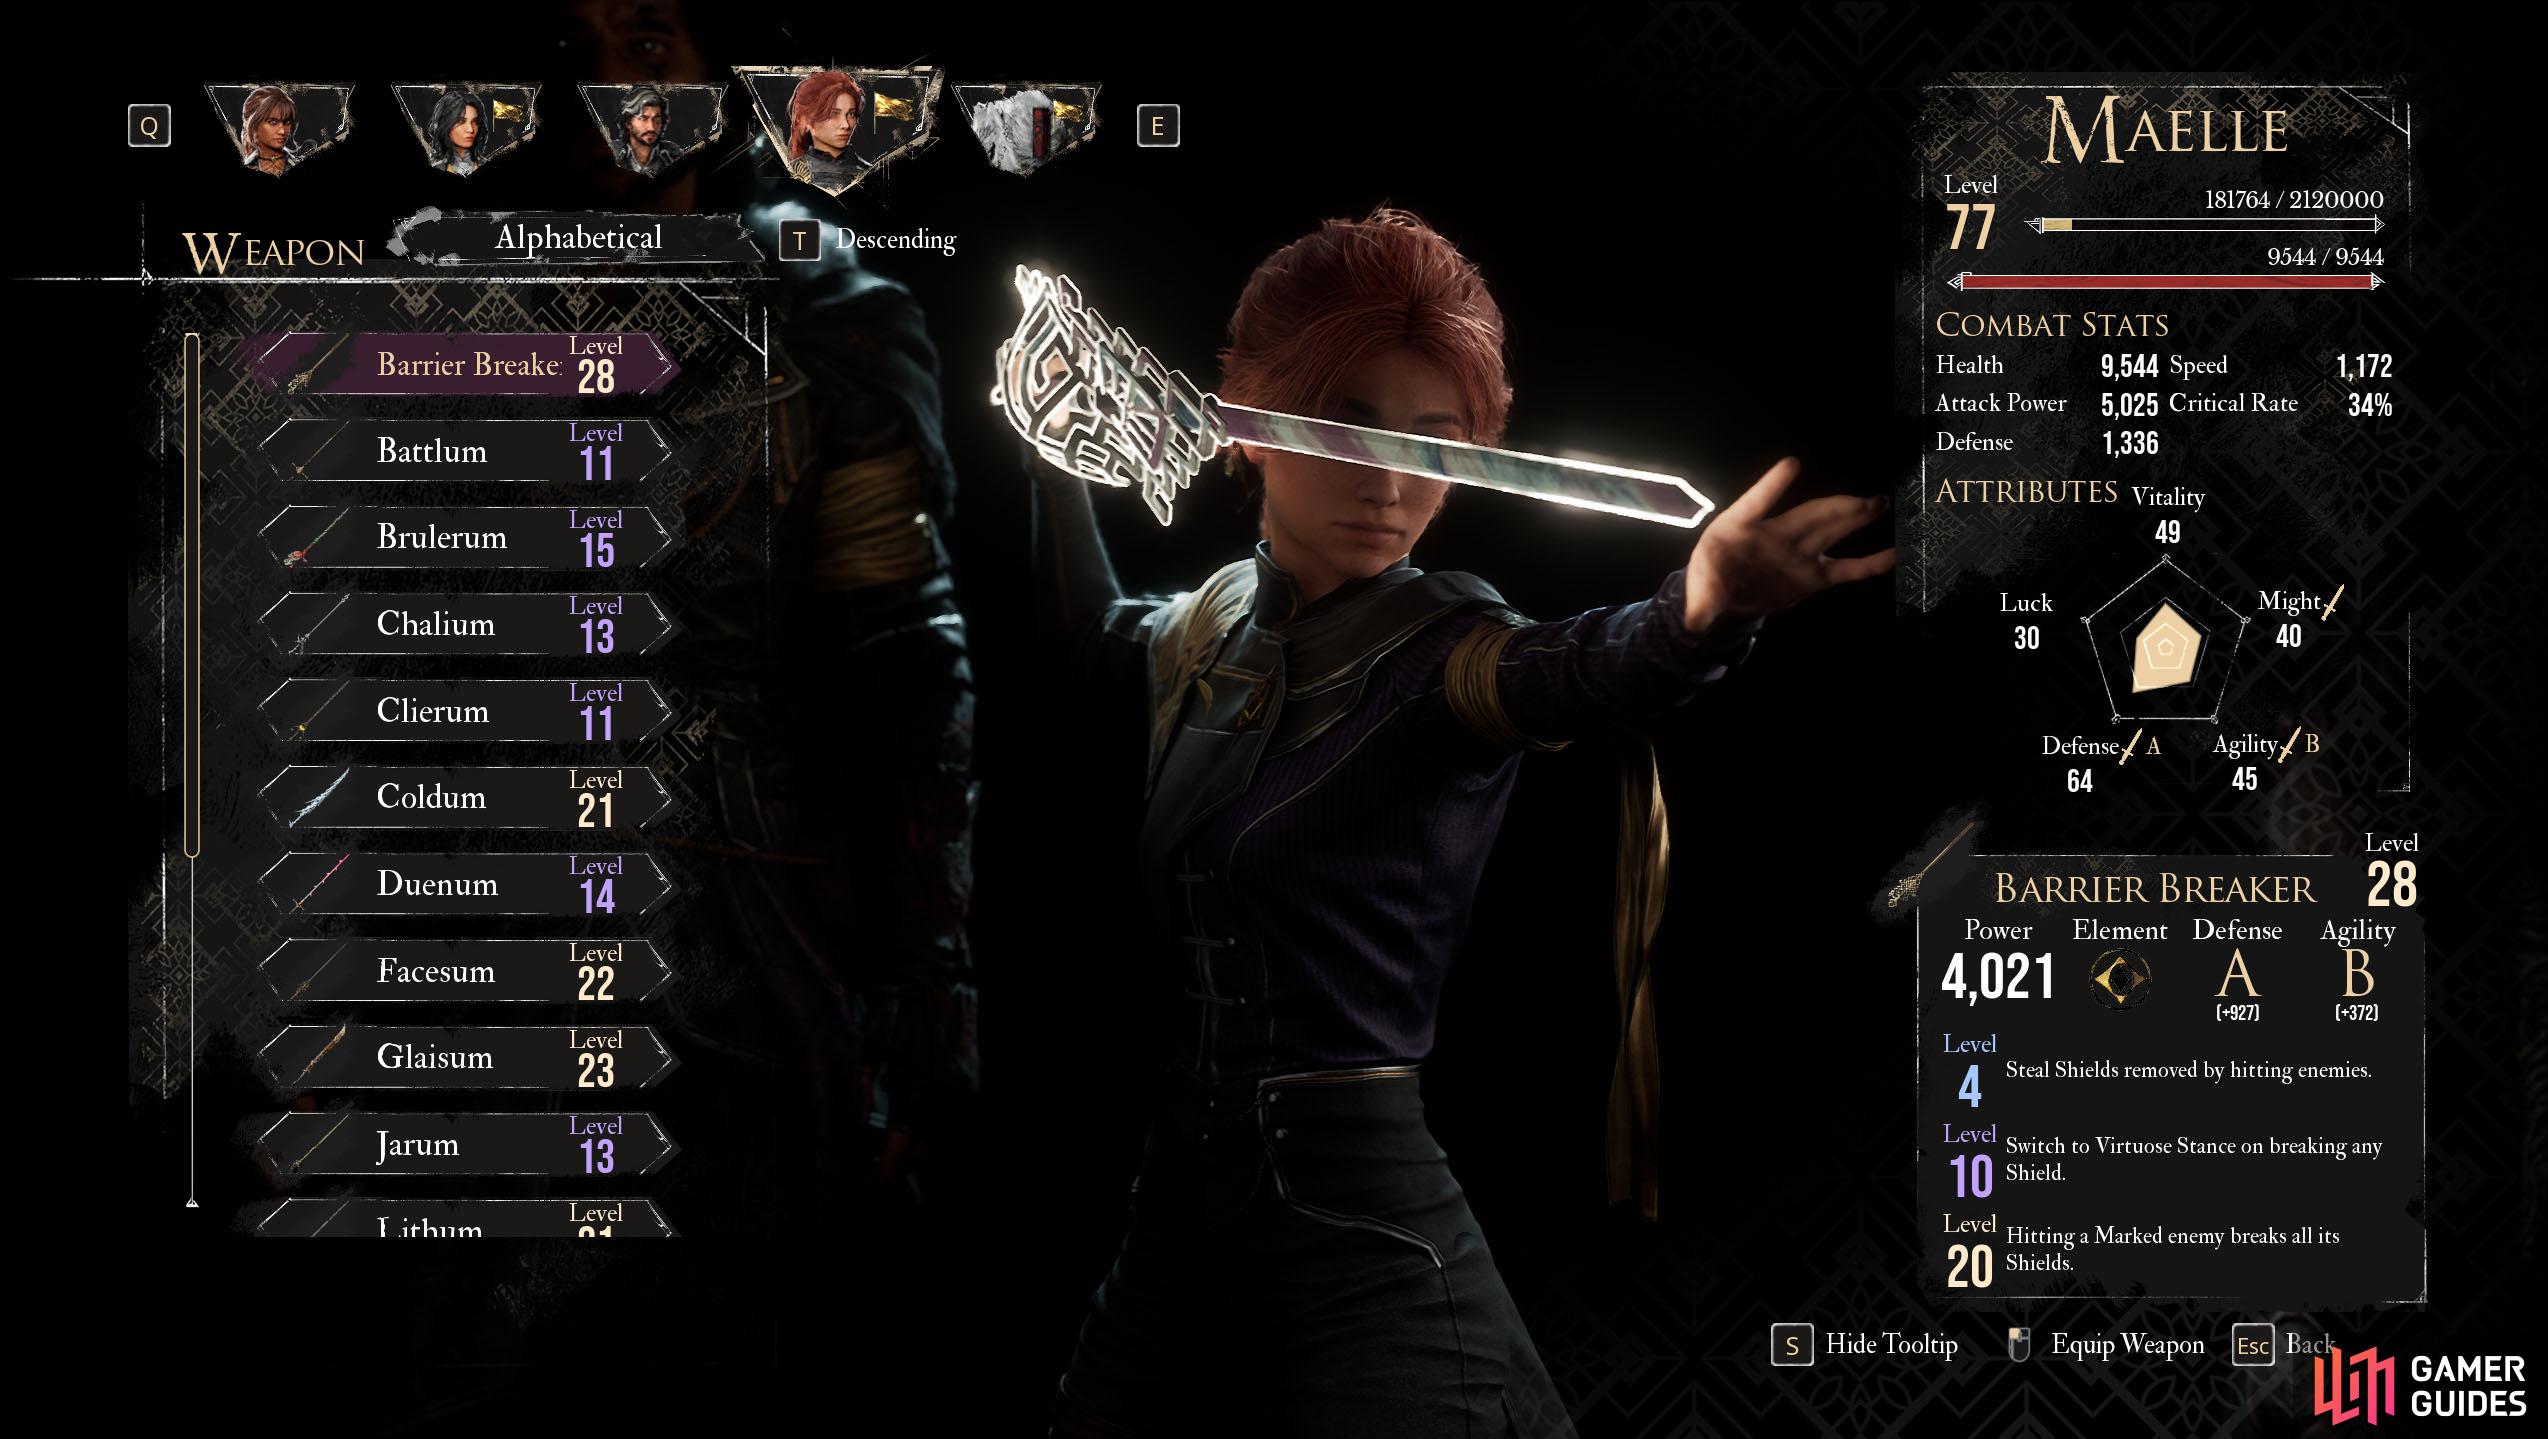
Maelle is all about finesse, which is why she uses a Rapier to dispatch her enemies.
Maelle is Gustave’s sister after his family took her in. She wields a rapier for quick and precise strikes as she utilizes her different stances to get a foot up on the enemy.
| Weapon | Location | Effect Lv 4 | Effect Lv 10 | Effect Lv 20 |
|---|---|---|---|---|
| On Defensive Stance, gain 1 Shield per Parry. Lose all Shields on turn start | 20% increased Light damage with Skills | 50% increased Counter damage per Shield | ||
| Double Gradient generation while in Defensive Stance | If Stanceless, Base Attack switches to Defensive Stance | +5% of a Gradient Charge on Parry | ||
| Critical hits apply Burn | Base Attack applies 2 Burn | 100% Critical Chance while Stanceless | ||
| Defeat both Axons in the story | Steal Shields removed by hitting enemies | Switch to Virtuose Stance on breaking any Shield | Hitting a Marked enemy breaks all its Shields | |
| Play again after a Base Attack | On Defensive Stance, gain 1 Shield per Parry. Lose all Shields on turn start | 20% increased Light damage with Skills | ||
| On turn start, if Stanceless, switch to Offensive Stance | Fire Skills cost 1 less AP | +1 Shield on switching to Offensive Stance | ||
| Critical hits with Skills give 2 AP. Once per turn | 20% increased Lightning damage with Skills | +50% Critical Chance while in Offensive Stance | ||
| Self-Heal by 2% Health on dealing a Critical hit | +50% Critical Chance while in Defensive Stance | If Stanceless, Base Attack switches to Defensive Stance | ||
| In Defensive Stance, gaining AP also gives 1 AP to allies | If Stanceless, Base Attack switches to Defensive Stance | +1 AP on Stance switch | ||
| Isle of Eyes: Defeat the Boss | In Offensive Stance, double the amount of Burn applied | 50% increased Burn damage | Base Attack propagates Burn | |
| Fallen Leaves: Defeat |
Allies recover 20% Health on switching to Virtuose Stance | Gain Shell when switching out of Virtuose Stance | Cleanse self Status Effects when switching to Virtuose Stance | |
| World Map - Defeat the |
Switch to Virtuose Stance on Counterattack | Apply 5 Burn on Counterattack | 50% increased Counter damage per Shield | |
| In Virtuose Stance, hitting a Marked enemy doesn’t remove Mark | Switch to Virtuose Stance on Counterattack | Gain Shell when switching out of Virtuose Stance | ||
| Default | – | – | – | |
| Start in Virtuose Stance | In Virtuose Stance, every Burn applied is doubled | In Virtuose Stance, Burn deals double damage | ||
| Allies recover 20% Health on switching to Virtuose Stance | Applies Shell when Health is above 80% | Switch to Virtuose Stance when Health falls below 50% | ||
| On turn start, if Stanceless, switch to Defensive Stance | In Defensive Stance, double Break damage | Support Skills cost 1 less AP | ||
| +1 Shield on switching to Offensive Stance | If Stanceless, Base Attack switches to Offensive Stance | +50% Critical Chance while in Offensive Stance | ||
| Switch to Virtuose Stance on breaking any Shield | Free Aim shots break 2 Shields | In Virtuose Stance, all damage pierce Shields | ||
| In Defensive Stance, double Break damage | Gain 9 AP on Breaking an enemy | Breaking an enemy deals a high amount of Earth damage |
All Sciel Weapons
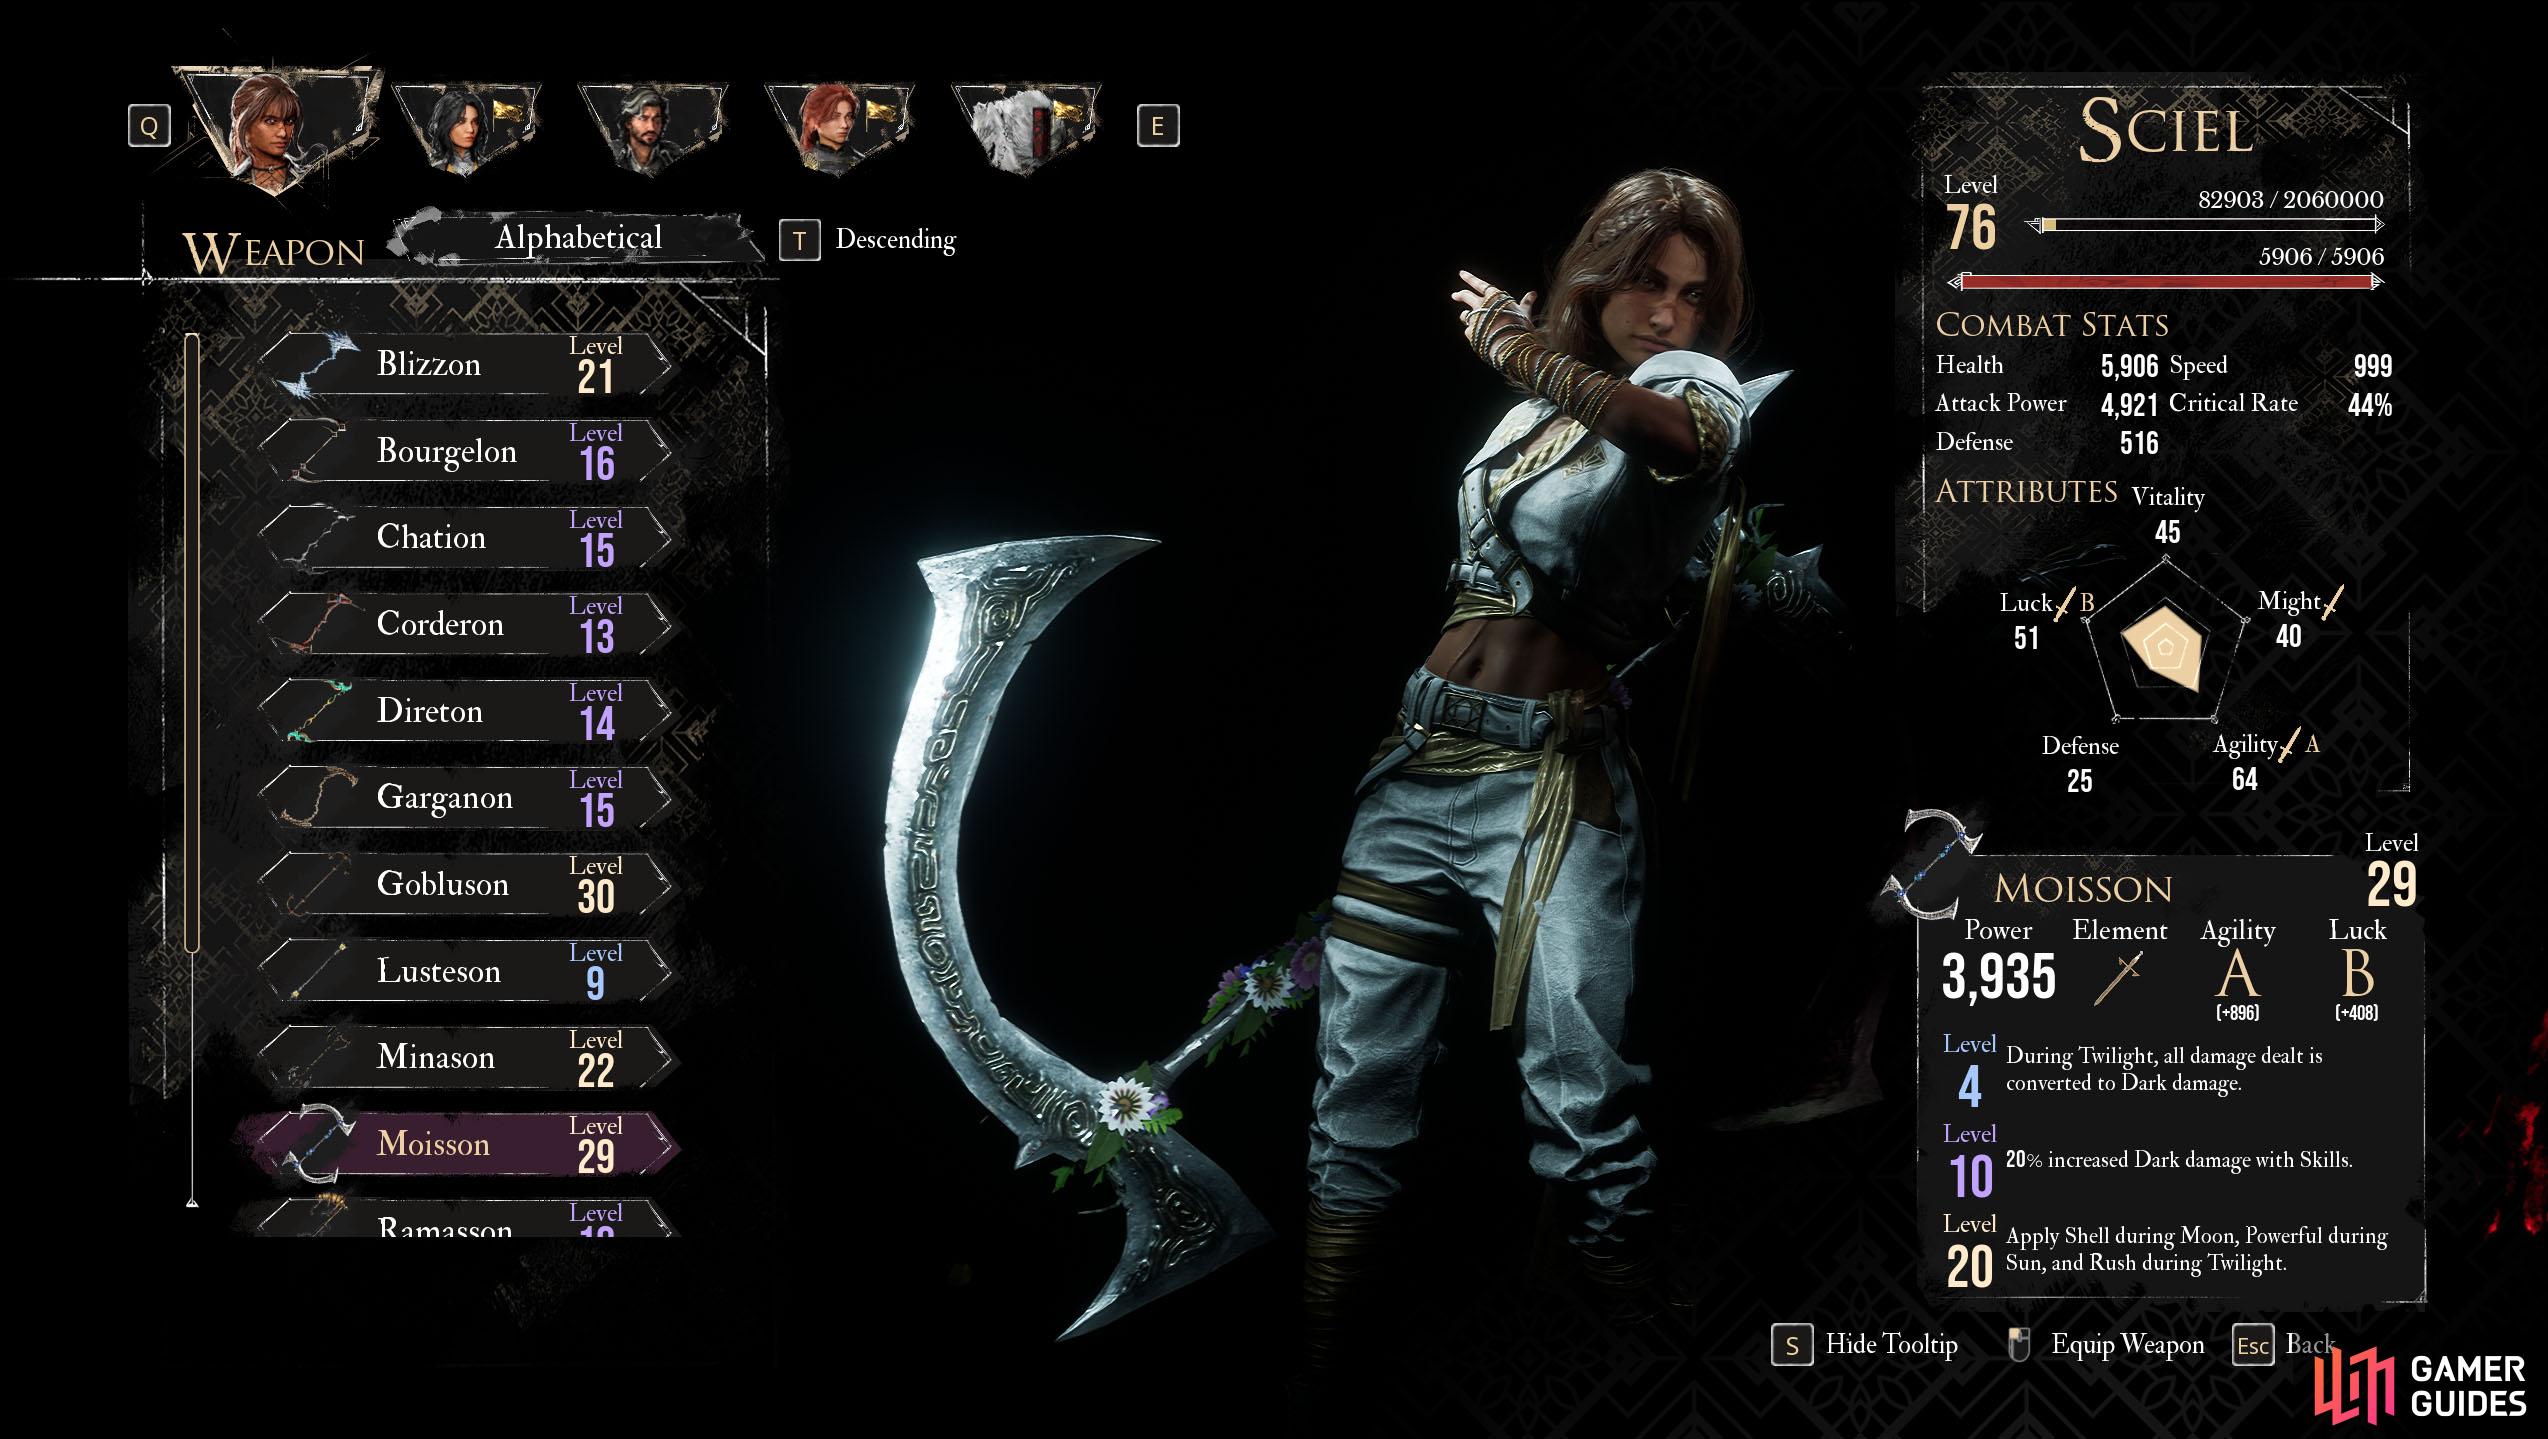
Sciel wields a double-bladed Scythe to make quick work of the Nevrons.
Sciel will join the party when you reach the ![]() Gestral Village during Act 1. She comes equipped with a double-bladed scythe and uses her cards to place Foretell on the enemies to increase the damage she does to them.
Gestral Village during Act 1. She comes equipped with a double-bladed scythe and uses her cards to place Foretell on the enemies to increase the damage she does to them.
| Weapon | Location | Effect Lv 4 | Effect Lv 10 | Effect Lv 20 |
|---|---|---|---|---|
| Old Lumiere - Entrance: Purchase from the trader (need to fight him) | Free Aim shots can consume 1 Foretell to deal 100% more damage | Base Attack applies 3 Foretell | During Twilight, Free Aim shots deal double damage | |
| Fallen Leaves - Dropped by |
While having at least 1 active Moon charge, Moon Skills are always Critical but damage taken is doubled | 25% increased damage per Moon charge | Base Attack gives 1 Moon charge | |
| Consuming Foretell applies 2 Burn on target per Sun Charge | 100% increased Burn damage in Twilight state | Sun Skills give one more charge | ||
| – | 100% Critical Chance during Twilight | Apply 1 Foretell on Critical hit | 20% increased damage for each consecutive turn without taking damage. Can stack up to 5 times | |
| Sun Skills always apply 10 Foretell, but all damage taken is doubled | Base Attack gives 1 Moon charge and consumes all Foretell to apply Burn | 100% increased Burn damage in Twilight state | ||
| World Map - Western beach of the large island northwest of |
During Twilight, all damage dealt is converted to Dark damage | 20% increased Dark damage with Skills | Apply Shell during Moon, |
|
| Curse self on battle start. Deal 50% more damage while Cursed | Reset Curse duration when entering Twilight state | Play again when entering Twilight state | ||
| +1 AP per Moon charge on turn start | Base Attack gives 1 Moon charge | During Twilight, Base Attack consumes all AP. Base Attack applies 1 Foretell and deals 50% increased damage per AP consumed | ||
| Inside the Monolith - |
While having at least 1 active Sun charge, apply one Burn stack per hit taken | Counterattacks apply 1 Burn per active Sun charge | Base attack can consume 1 Sun charge to apply 5 Foretell | |
| During Twilight, every time Foretell is applied it also affects another random enemy | Apply 1 Burn every 3 Foretell applied with Skills | 20% increased Fire damage with Skills | ||
| Free Aim shots can consume a Sun charge to apply 5 Foretell and consume a Moon charge to deal 400% more damage | Consuming a Sun or Moon charge gives 1 AP | Base Attack gives 1 Moon charge | ||
| Killing an enemy with Foretell applies its Foretell to another random enemy | Apply Mark on consuming Foretell | 20% increased Dark damage with Skills | ||
| Sun Skills have increased damage for each Foretell on the target. Moon Skills don’t generate Moon charges anymore | With at least 1 active Sun charge, gain one additional AP per Foretell consumed | Base attack can consume 1 Sun charge to apply 5 Foretell | ||
| Can consume 1 Moon charge on turn start to recover 20% of each ally’s Health | Base Attack gives 1 Moon charge | Moon Skills give one more charge | ||
| Recover 5% Health per Foretell applied | Healing Skills cost 1 less AP | 30% increased Heal efficiency per Moon charge. Base Attack gives 1 Moon charge | ||
| On Twilight Start, apply Mark to all enemies | Hitting a Marked enemy during Twilight doesn’t remove Mark | Apply 3 Foretell on applying Mark | ||
| During Moon, all allies have |
During Twilight, all allies have |
+3 AP on applying a Buff or Debuff. Once per turn | ||
| On turn start, gain 1 Shield if at least 1 Sun charge is active | Apply 5 Foretell on enemies that break Shields | +2 Sun charges on Counterattack | ||
| Default | – | – | – | |
| Extend Twilight by one turn on using a Moon Skill. +50% Twilight damage increase on using a Sun Skill | Twilight duration is increased by 1 | Play again when entering Twilight state | ||
| On Twilight Start, deal damage to all enemies based on the amount of charges | On Twilight Start, apply 2 Foretell per charge to all enemies | Double Sun and Moon charge generation |
All Monoco Weapons
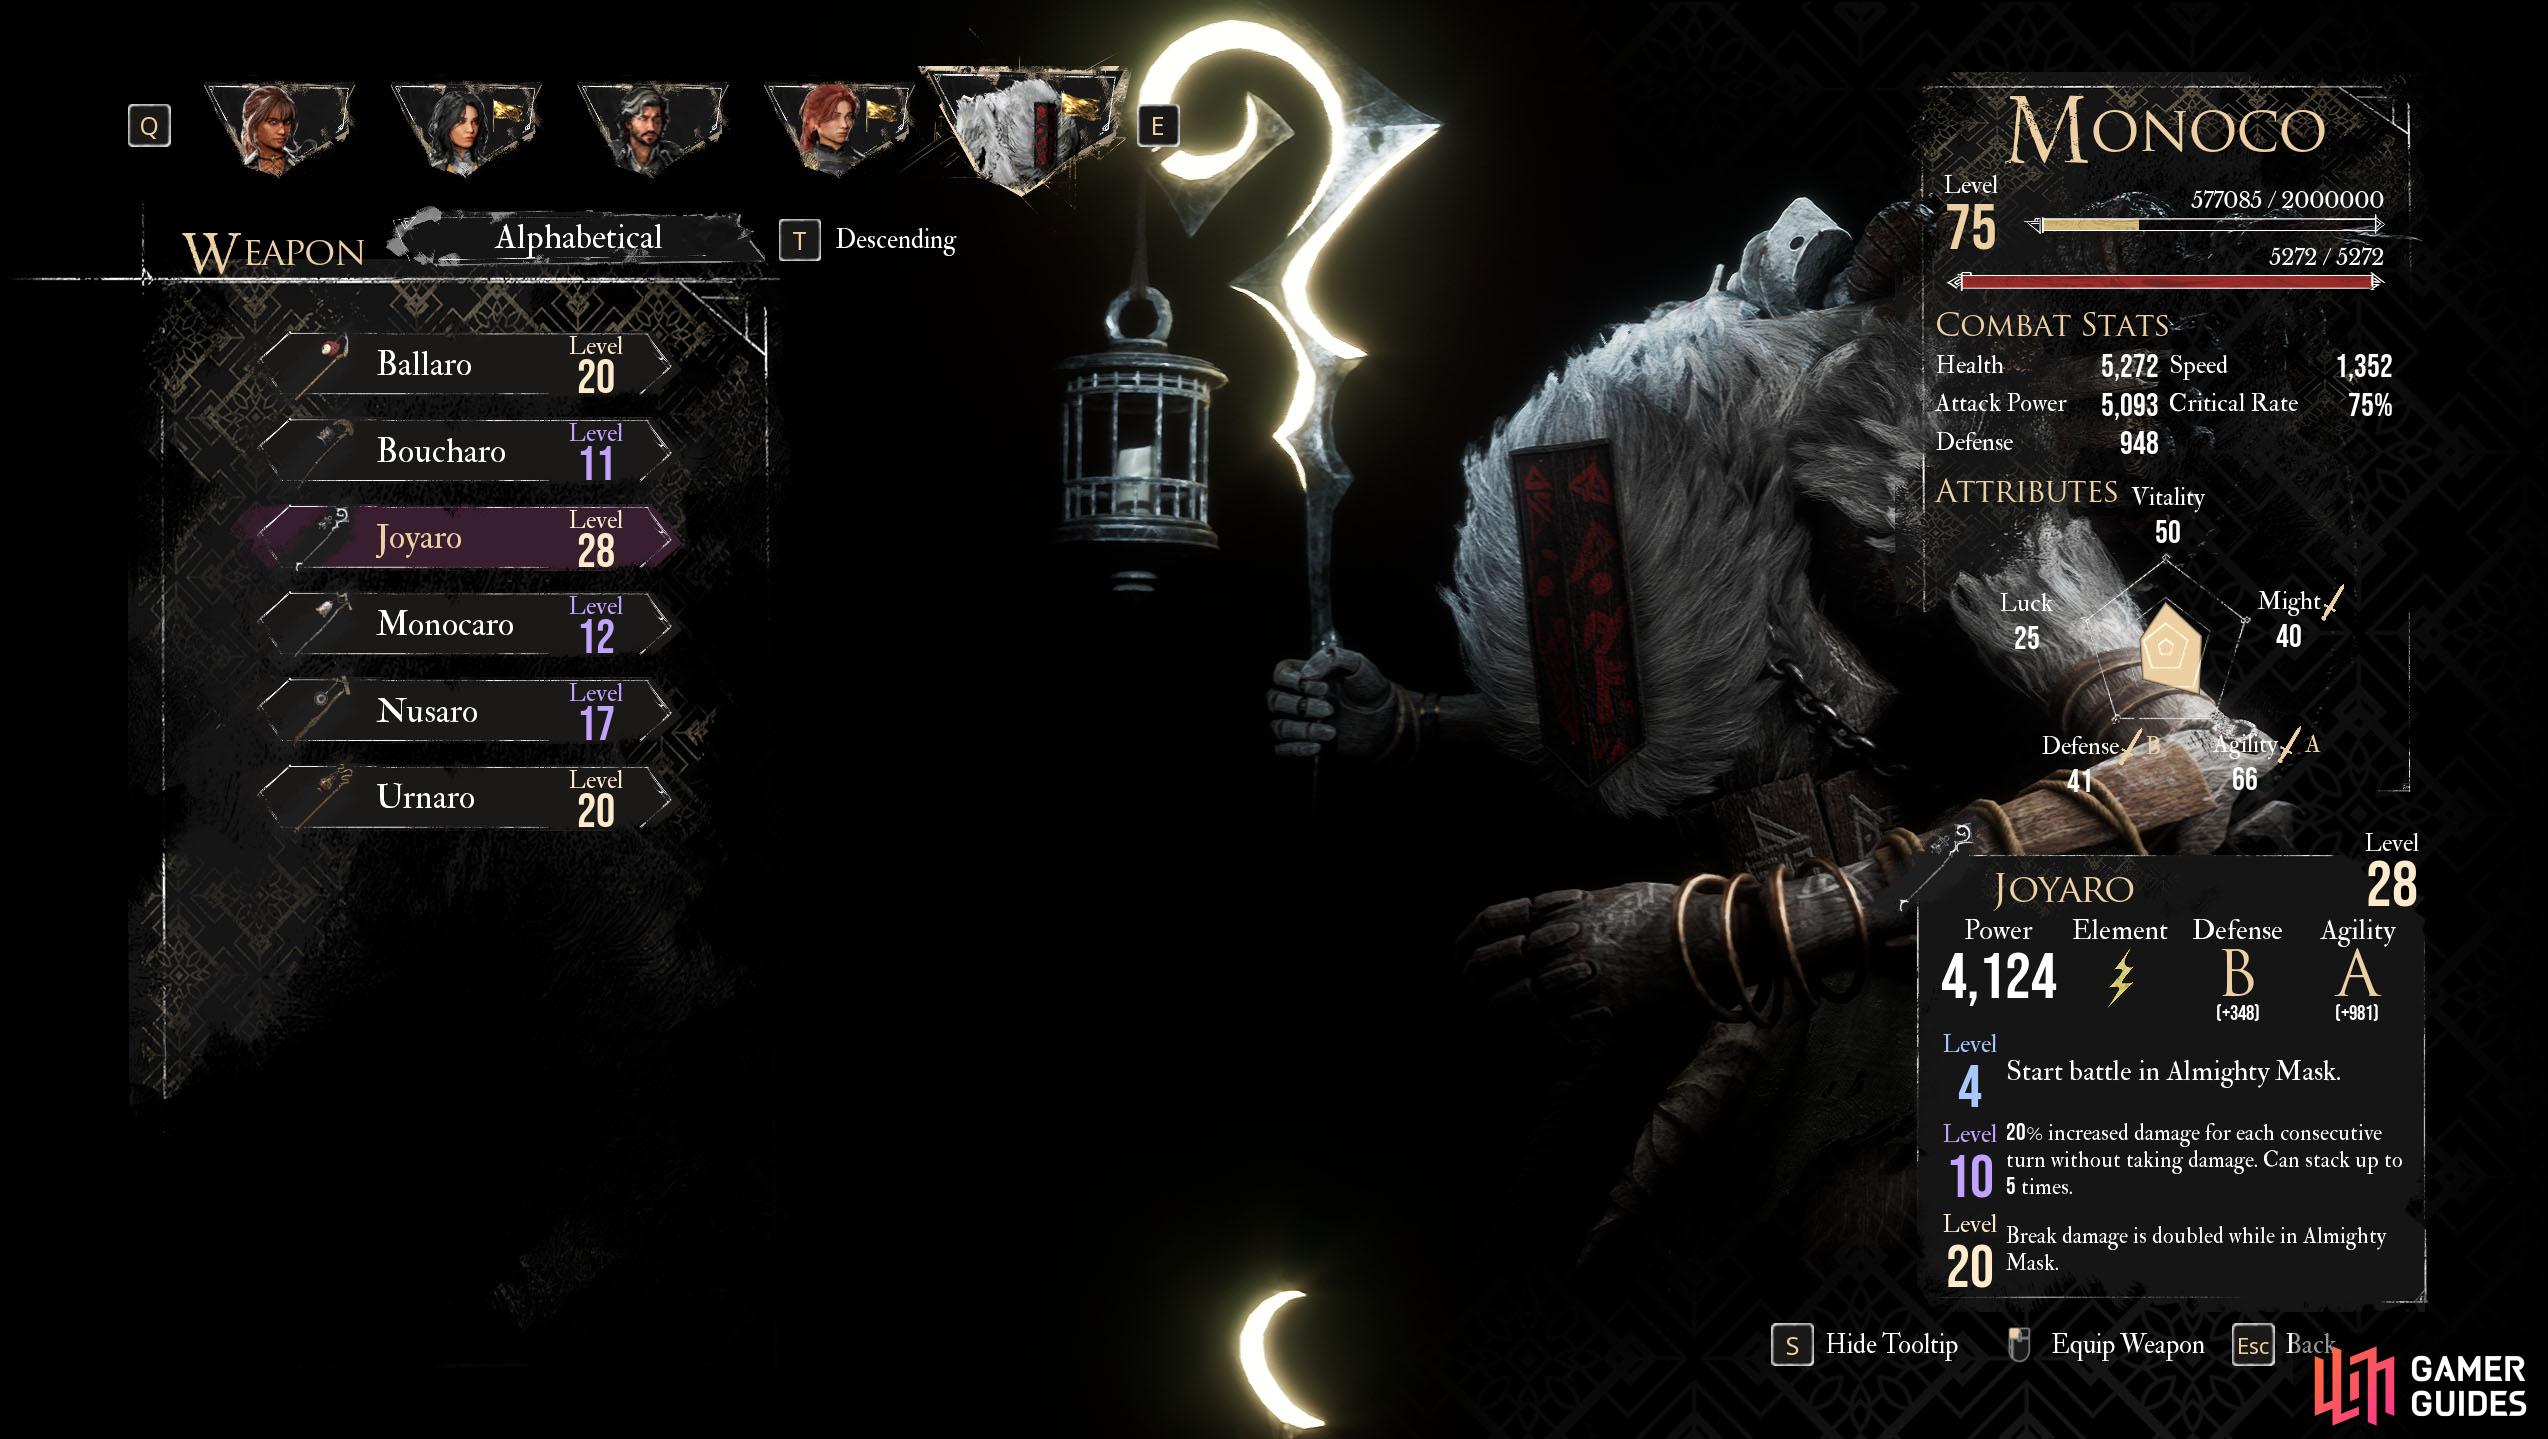
Monoco wields a Staff-like Lamp weapon that allows him to briefly shapeshift to perform his skills.
Monoco is different from the rest of the party, who are all human. He is a Gestral, much like the others you’ve seen across the mysterious continent, although he appears to be a lot more intelligent. He wields a staff-like weapon that allows him to shapeshift into Nevrons to perform their attacks, thanks to eating their feet. Monoco is the final party member you will get to join your entourage, so don’t expect to see him before Act 2.
| Weapon | Location | Effect Lv 4 | Effect Lv 10 | Effect Lv 20 |
|---|---|---|---|---|
| World Map - Northern beach near |
Reverse Bestial Wheel order | Using an Upgraded Skill gives 1 AP to all other allies | Almighty Mask gives 2 AP to all allies | |
| Start battle in Agile Mask | Agile Mask applies |
+50% Critical Chance while in Agile Mask | ||
| World Map - Floating island west of |
Replay instantly when in Almighty Mask | +3 AP when in Almighty Mask | Revive instantly with full Health if dead while in Almighty Mask. Once per Battle | |
| – | Start battle in Caster Mask | Caster Mask applies Regen for 3 turns | Skills cost 1 less AP while in Caster Mask | |
| Inside the Monolith - Purchase from the trader | Free Aim shots spin the Bestial Wheel to a random value | Free Aim shots deal 100% more damage with all Masks except Almighty | 100% Critical Chance while in Almighty Mask | |
| Start battle in Heavy Mask | Heavy Mask applies Shell for 3 turns | +1 AP per hit taken | ||
| Start battle in Almighty Mask | 20% increased damage for each consecutive turn without taking damage. Can stack up to 5 times | Break damage is doubled while in Almighty Mask | ||
| Default | – | – | – | |
| Parries increase the Bestial Wheel by 1. Taking damage resets the Bestial Wheel | Upgraded Skills deal 30% more damage | +1 AP on Mask change | ||
| 30% increased damage per Upgraded Skill used. Resets on using a non-Upgraded Skill | Base Attack spins the Bestial Wheel to a random value | Using an Upgraded Skill gives 1 AP to all other allies | ||
| Switch to Almighty Mask on Breaking an enemy | Almighty Mask gives 2 AP to all allies | 50% increased Break damage |
All Verso Weapons
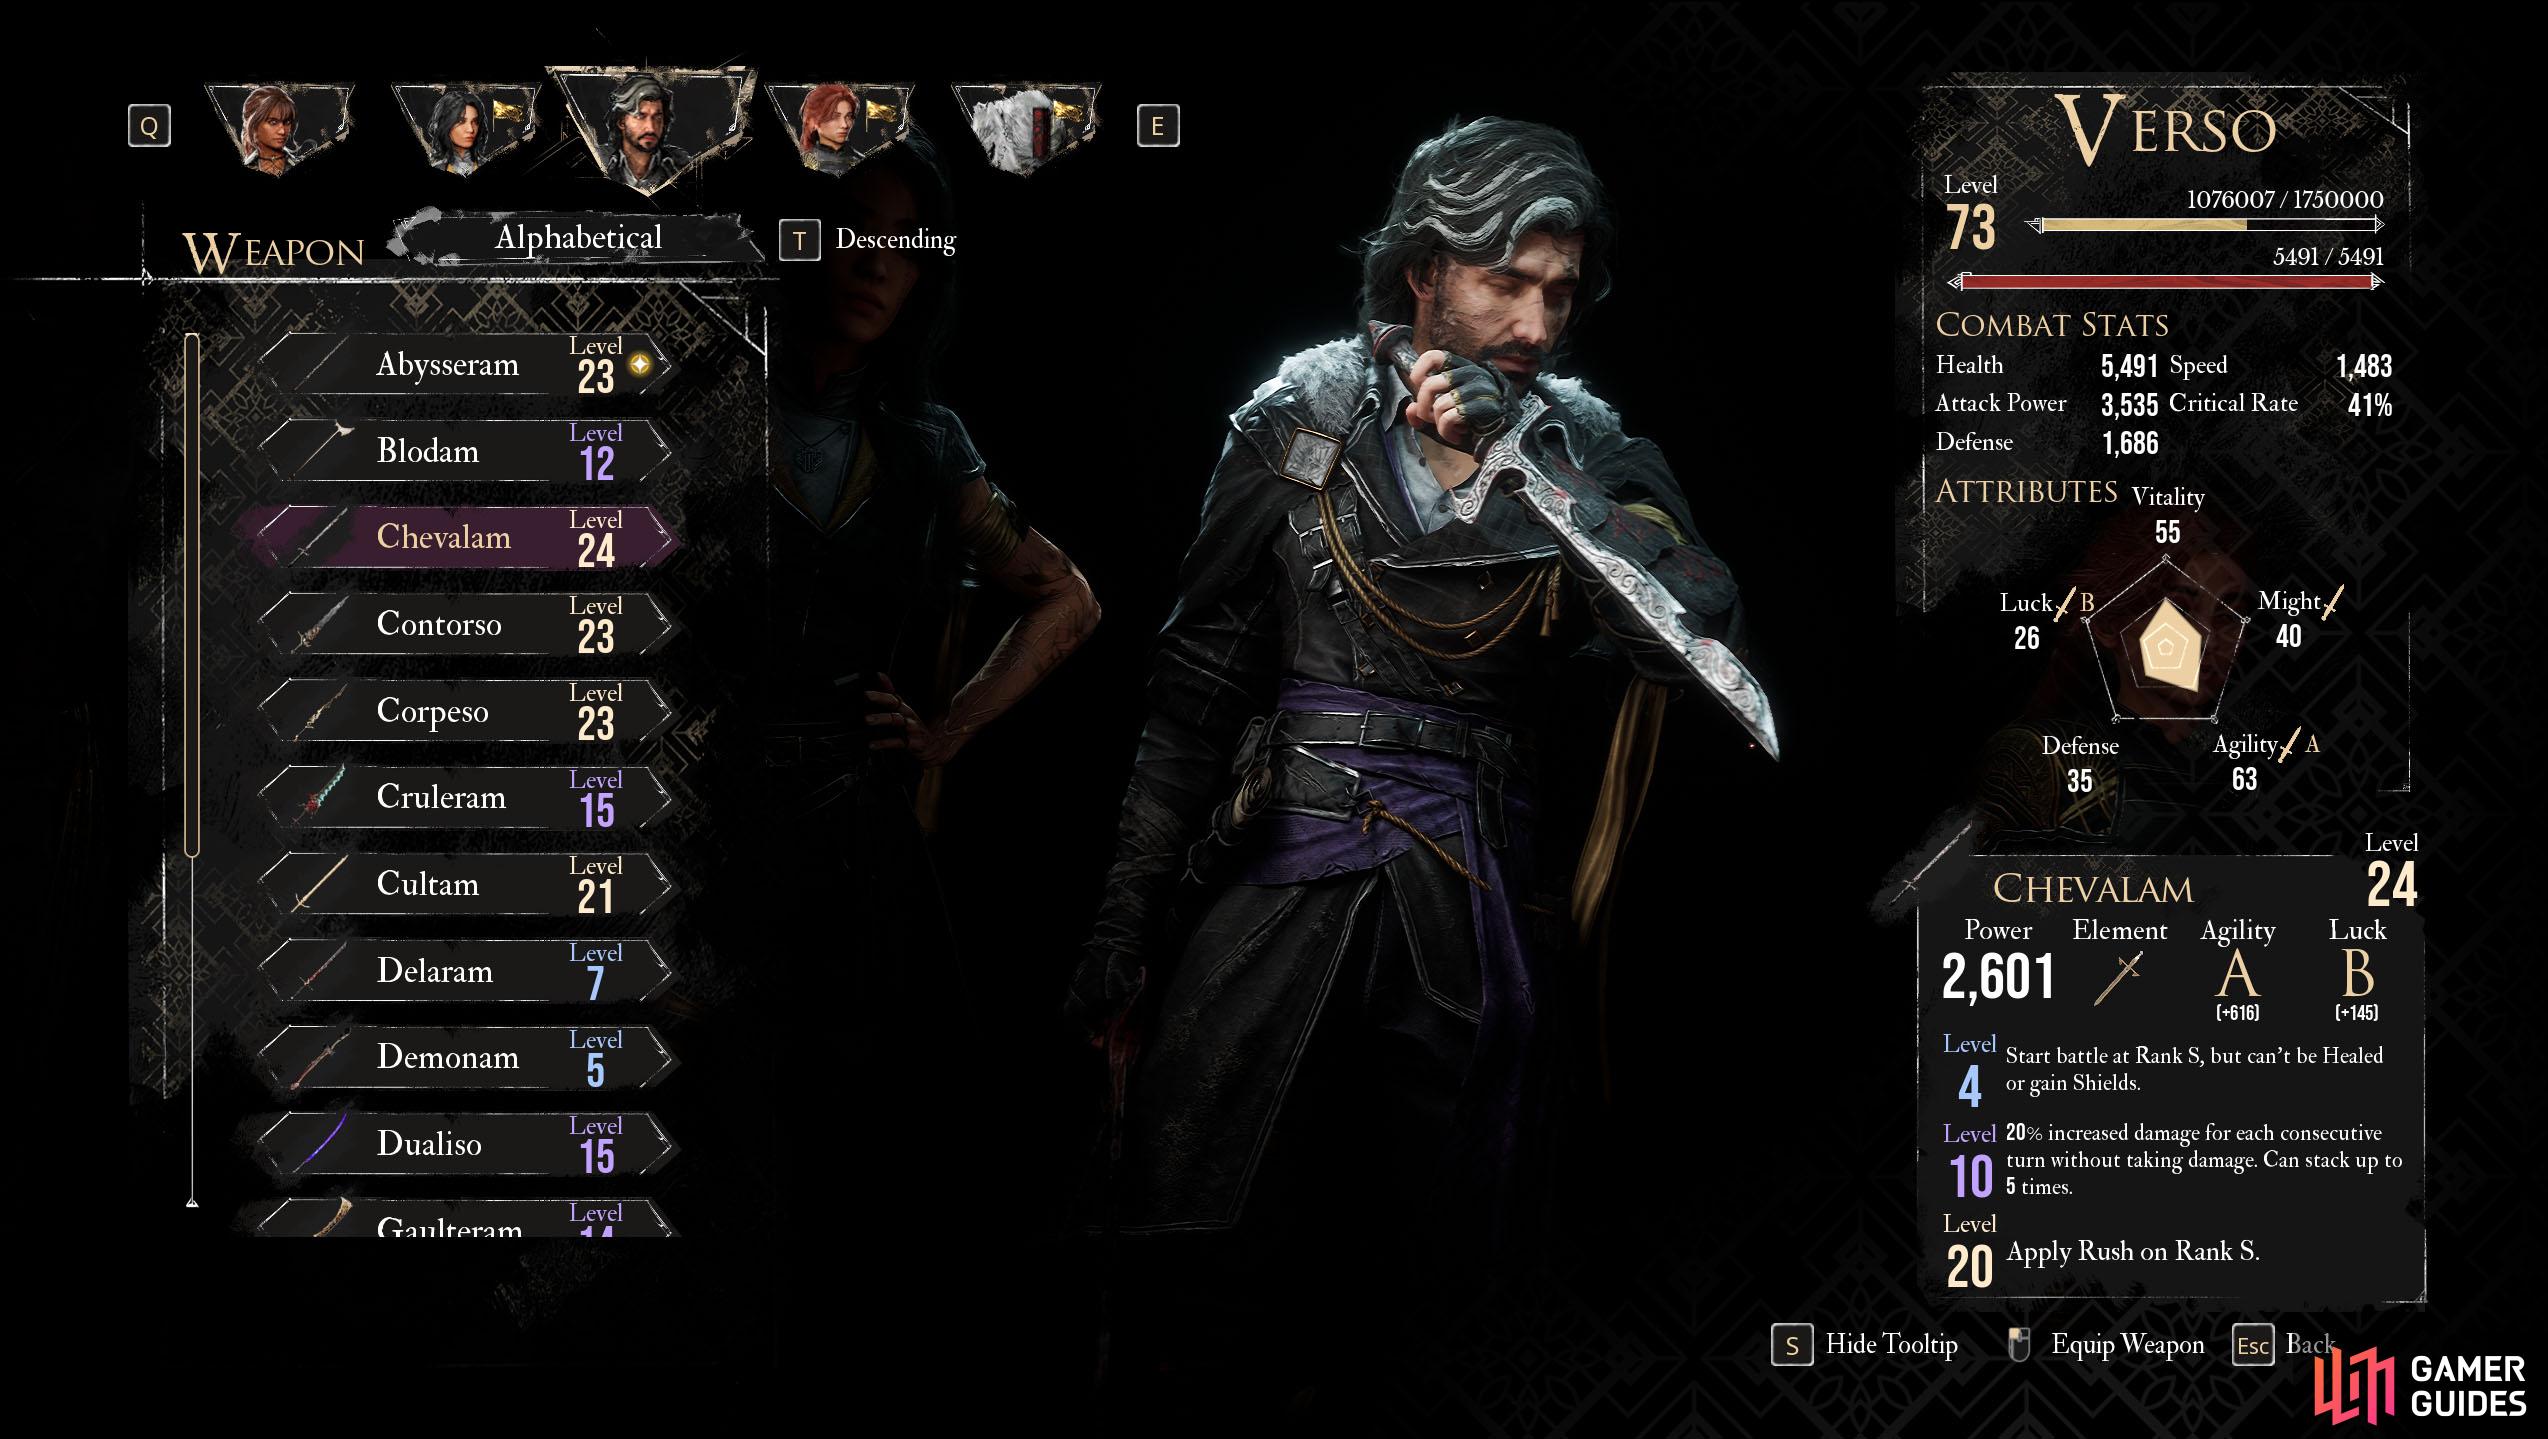
Verso wields a Sword and Dagger combo to deal with his enemies.
Verso is a mysterious party member who appears to be tied to the main plot of the storyline, more so than the other party members, although you won’t know why until much later in the game. He comes equipped with a Sword and Dagger combo and uses the Perfection mechanic to hurt his enemies.
| Weapon | Location | Effect Lv 4 | Effect Lv 10 | Effect Lv 20 |
|---|---|---|---|---|
| 50% increased damage on Rank D. No damage increase on other ranks | 50% increased Base Attack damage | On Rank D, recover 20% Health with Base Attack | ||
| World Map - Beach east of |
Perfection is now based on current Health. Gain 1 Rank every 20% missing Health | 20% increased Light damage with Skills | +1 AP on Rank Up | |
| Start battle at Rank S, but can’t be Healed or gain Shields | 20% increased damage for each consecutive turn without taking damage. Can stack up to 5 times | Apply |
||
| Light damage can Burn on Critical hits | Apply 3 Burn instead of Mark | Increase Burn damage by 50% per Rank, up to 300% on Rank S | ||
| Switch to Rank S on Break. Base Attack can Break | 100% Critical Chance on Rank S | Triggers a lightning strike on Critical hits | ||
| Base Attack applies 2 Burn stack per Rank | +1 AP on Rank Up | Increase Burn damage by 50% per Rank, up to 300% on Rank S | ||
| Don’t lose Rank when taking damage from Powerless enemies | +1 Perfection on hitting a Powerless enemy | Apply Powerless on Counterattack | ||
| No Perfection loss on damage taken. Perfection is instead lost on being Healed | Gain 2 AP on Counterattack | Gain 1 Rank on Counterattack | ||
| Base attack gives 1 Perfection per Burn on target | While |
+1 AP on Rank Up | ||
| Start battle on Rank B, but 50% Health | Recover 15% Health on Base Attack | Apply |
||
| Casting a Light Skill increases damage of next Physical Skill cast by 50% and vice versa | 20% increased Physical damage with Skills | Dealing Light damage with a Skill recovers 3% Health | ||
| Inside the Monolith - |
Gain 1 Rank on Counterattack | 50% increased Counterattack damage | Gain 2 AP on Counterattack | |
| Play again after a Base Attack | 50% increased Base Attack damage | Base Attack gives 4 Perfection | ||
| When hit, lose 1 Perfection instead of 1 Rank | Apply |
Gain 2 Perfection on turn start | ||
| Convert Light damage from Skills to Physical damage | 20% increased Physical damage with Skills | -1 AP cost for Physical Skills | ||
| World Map - Near |
+1 Perfection on Critical hit | Self-Heal by 2% Health on dealing a Critical hit | Counterattack is always a Critical hit | |
| Inside the Monolith - |
Rank can’t be lower than C | Base Attack gives 4 Perfection | Parrying gives 2 Perfection instead of 1 | |
| Base Attack consumes all Shields to deal 100% increased damage per Shield | +1 Shield on Counterattack | Base Attack gives 4 Perfection | ||
| – | Double Perfection gained on Free Aim shots | Free Aim shots break 2 Shields | 50% increased Free Aim damage | |
| Can’t lose Perfection. No damage increase from Rank | 50% increased Base Attack damage | Base Attack gives 4 Perfection | ||
| +1 to all Perfection gain but can’t reach Rank S | Base Attack gives 4 Perfection | 20% increased Light damage with Skills | ||
| An ethereal Sword deals Light damage on any damage dealt with Skills | 20% chance to apply Burn on dealing Light damage | Can’t die if at least Rank A | ||
| Bonus damage from Perfection applies to all allies at half value. Bonus damage no longer applies to |
Perfection gained is increased by 1 while |
Support Skills cost 1 less AP | ||
| Gain 1 Rank on applying Mark | Mark an enemy on Base Attack | Apply Powerless on Marking an enemy | ||
| Default | – | – | – |
That’s it for all the weapons in the game. Note that you can get these weapons from other places, especially those that drop from enemies. If you fight these enemies while already owning the weapon, they will upgrade them.
No Comments