Updated Title Publisher
Updated Title
Published Title Score Editor's Choice Publisher
Published Title Publisher

Clair Obscur: Expedition 33

All Mime Locations

By
Ben Chard
Post a Comment

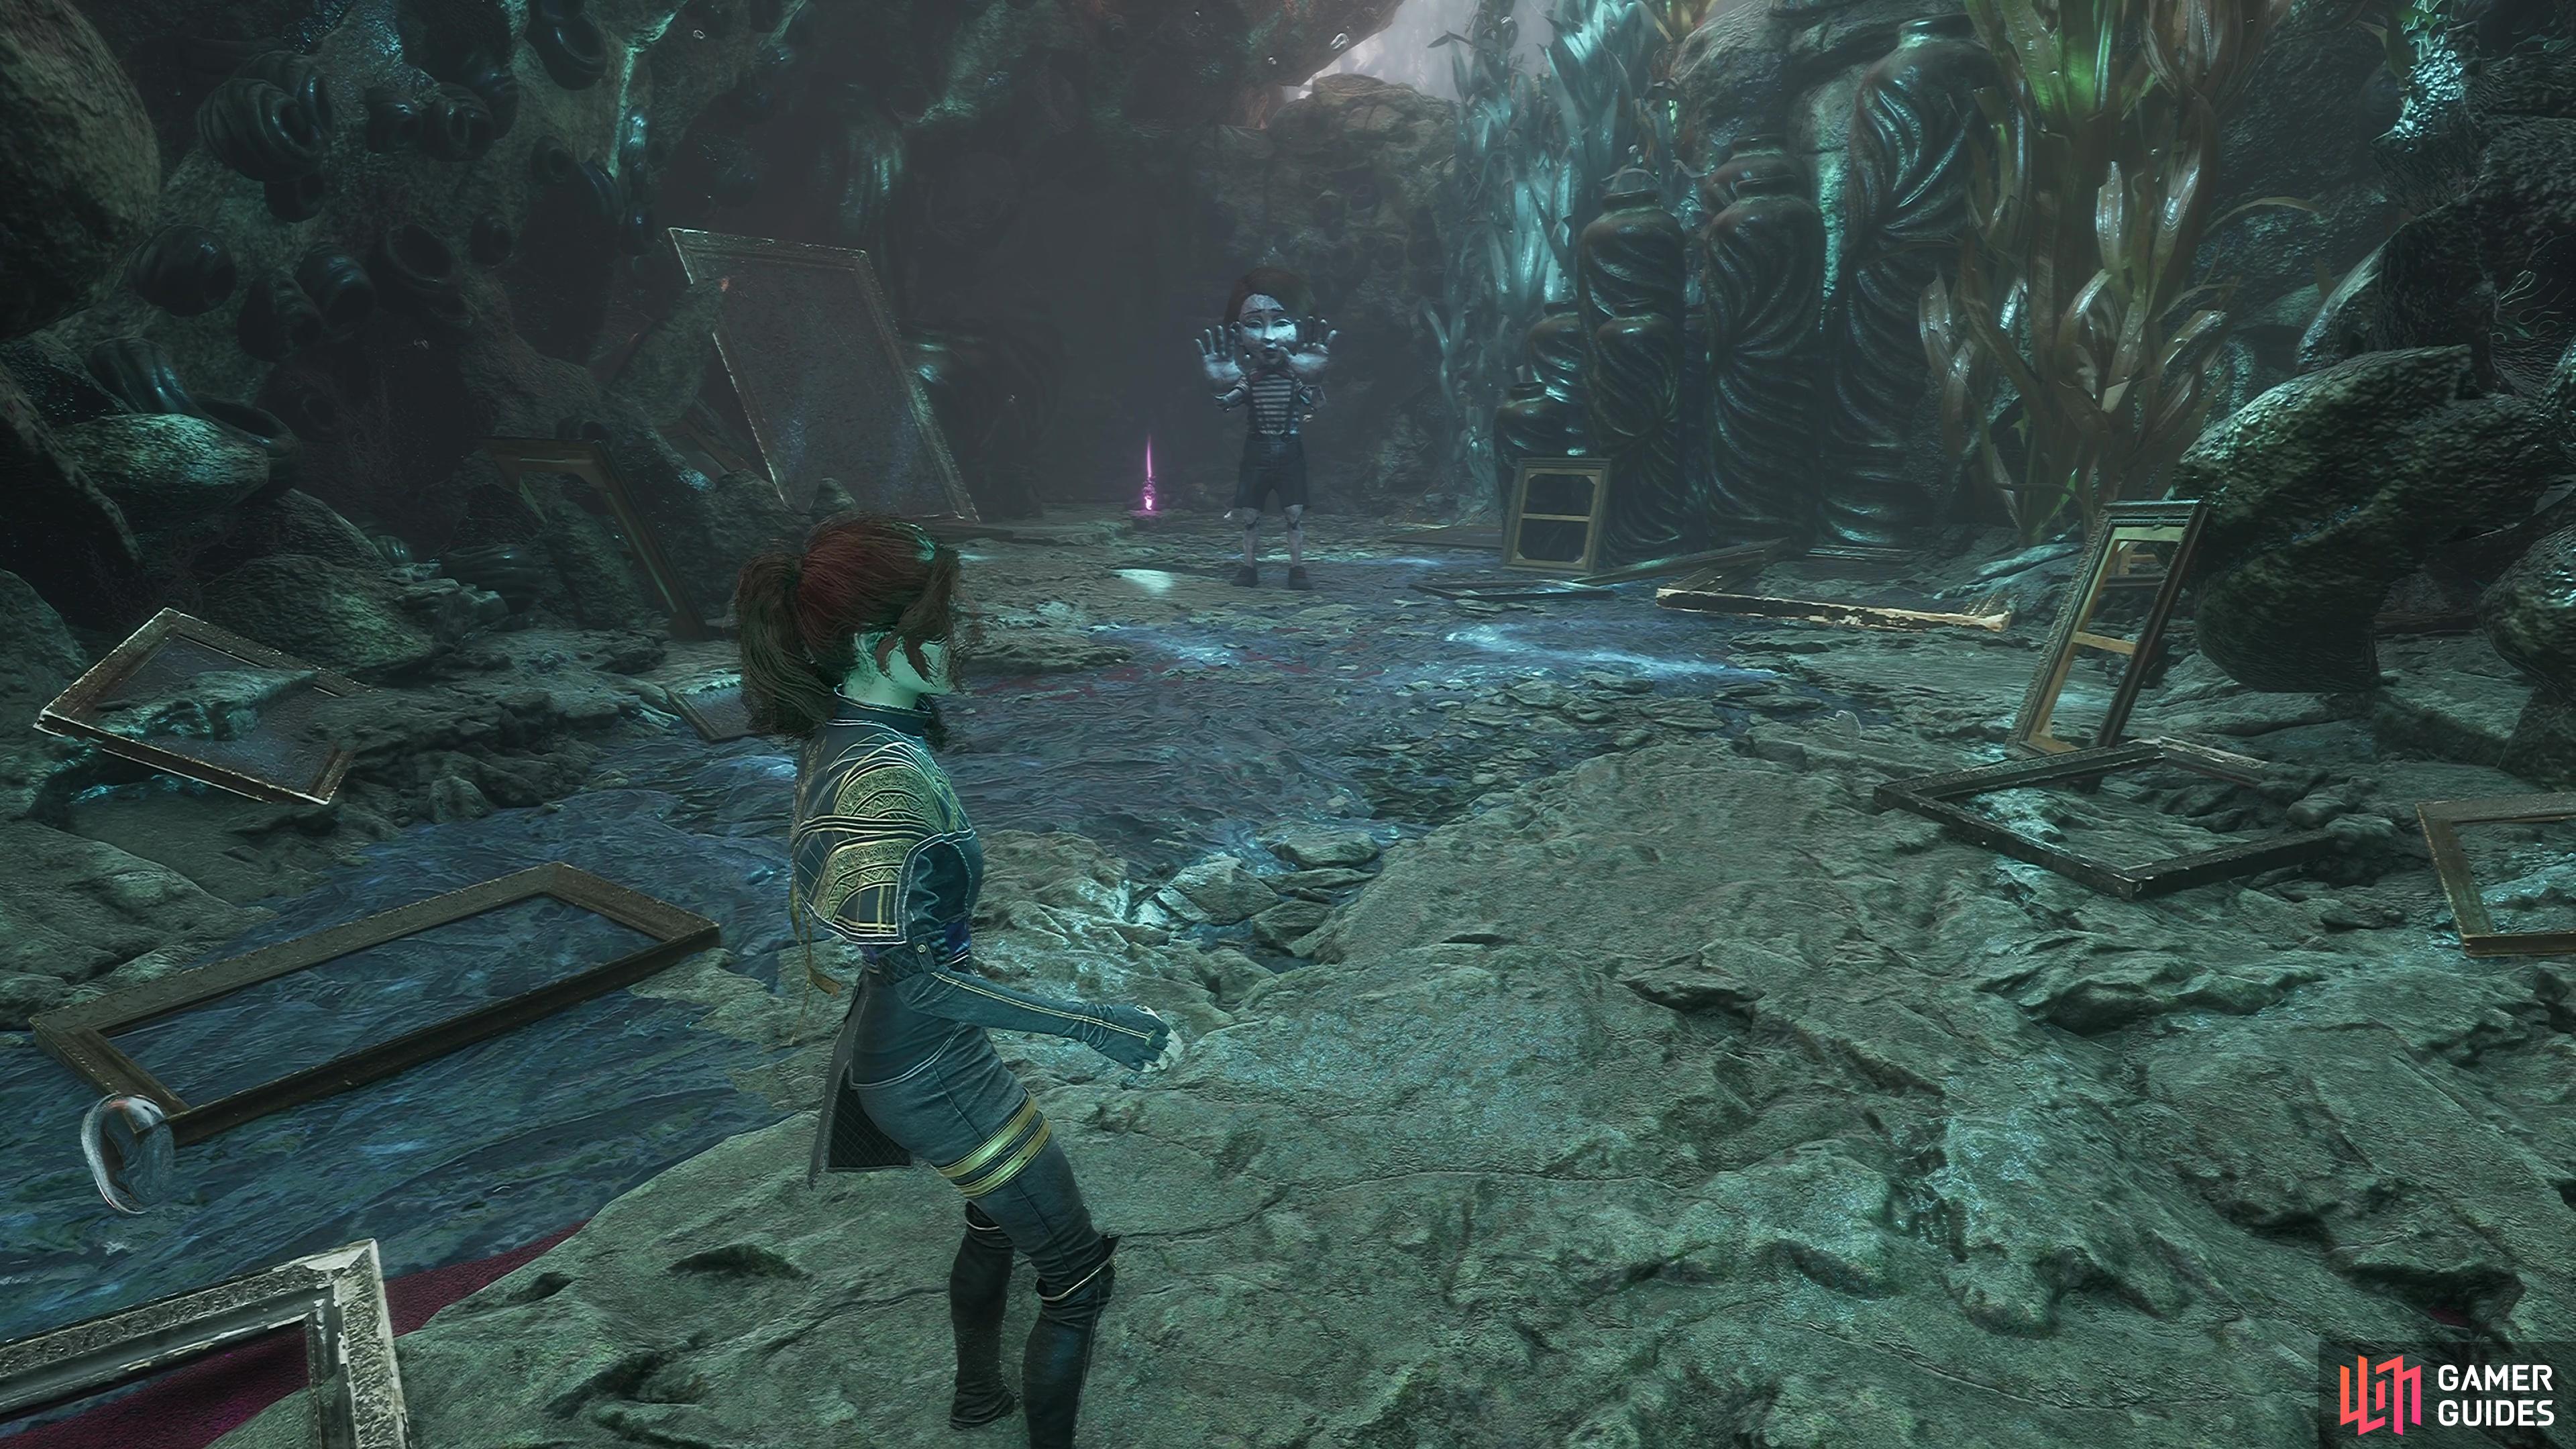
Clair Obscur: Expedition 33 features many optional and difficult encounters, but you’re often rewarded for it. There are many Mimes scattered across The Continent and defeating them will often reward you with a cosmetic based on what the enemy is wearing. There are a total of 14 Mimes in Clair Obscur: Expedition 33, and this page will show you where to find them all, with handy map markers.

There are 14 Mimes to find and defeat in Clair Obscur: Expedition 33.

Table of Contents

If you want to jump to a specific section, click on the links below.

Every Mime Location

As mentioned above, Mimes are challenging encounters that can usually be found in most major areas of the game. This isn’t the only place, however, as you can also find them on the World Map and there is even an ultimate Mime hiding out there. If you’re looking for assistance on how to defeat these tricky customers, hit the link above or scroll beyond the table below.

Number Location Reward Map Marker
1 Prologue - "Lumière" iconLumière: When you find the stage with the Pictos dancers (you can’t miss the flashy lights), look to the right to find this strange-looking Mime tucked away in the corner of the plaza Lumière Music Record Map Marker
2 "Spring Meadows" iconSpring Meadows - "Grand Meadow" iconGrand Meadow: Take the path around to the left. Go past the "Lancelier" iconLancelier, and use the grapple points to traverse the rocky path "Baguette (Gustave Outfit)" iconBaguette (Gustave Outfit), "Baguette (Gustave Haircut)" iconBaguette (Gustave Haircut) Map Marker
3 "Flying Waters" iconFlying Waters - "Coral Cave" iconCoral Cave: After you see the enormous giant Nevron in the distance after the "Coral Cave" iconCoral Cave area, look for a path in the reeds and climb the hand holds "Short (Maelle)" iconShort (Maelle) Map Marker
4 "Ancient Sanctuary" iconAncient Sanctuary - "Sanctuary Maze" iconSanctuary Maze: Hug the right-hand wall until you find a crawlspace. Inside, head left until you see the strange hut in a field of blue flowers and search behind it "Baguette (Lune Outfit)" iconBaguette (Lune Outfit), "Baguette (Lune Haircut)" iconBaguette (Lune Haircut) Map Marker
5 "Esquie's Nest" iconEsquie’s Nest - From the entrance, drop down into the water on your right "Baguette (Sciel Outfit)" iconBaguette (Sciel Outfit), "Baguette (Sciel Haircut)" iconBaguette (Sciel Haircut) Map Marker
6 "Yellow Harvest" iconYellow Harvest - "Harvester’s Hollow" iconHarvester’s Hollow: To the right of where you find the Journal - "Expedition 44" iconExpedition 44, look for a crawlspace under the rock wall "Braid (Maelle)" iconBraid (Maelle) Map Marker
7 World Map - Small red island north of "Esoteric Ruins" iconEsoteric Ruins. Two Mimes here in the same battle "Voluminous (Lune)" iconVoluminous (Lune), "Voluminous (Sciel)" iconVoluminous (Sciel) Map Marker
8 "Visages" iconVisages - "Joy Vale" iconJoy Vale: Left of the flag path and follow the ledge around on your left "Baguette (Verso Outfit)" iconBaguette (Verso Outfit), "Baguette (Verso Haircut)" iconBaguette (Verso Haircut) Map Marker
9 "Sirène" iconSirène - "Sewing Atelier" iconSewing Atelier: After exploring the enormous fabric caverns, you’ll eventually drop down a rope into a room with huge pillars adorned with jewels. Through an archway ahead of you, you’ll see a massive Nevron sewing. Don’t walk past the pillars; the Mime can be found around the corner from here, to the left "Sirène (Lune)" iconSirène (Lune) Map Marker
10 Inside the Monolith - "Tainted Cliffs" iconTainted Cliffs: Go right from the flag and then left down a rope "Voluminous (Maelle)" iconVoluminous (Maelle) Map Marker
11 "The Reacher" iconThe Reacher - "Ladder Area" iconLadder Area: Go across the first bridge and drop down to your left "Baguette (Maelle Outfit)" iconBaguette (Maelle Outfit), "Baguette (Maelle Haircut)" iconBaguette (Maelle Haircut) Map Marker
12 "Frozen Hearts" iconFrozen Hearts - "Iced Heart" iconIced Heart: As you grapple up the trains, go to where the Trader is then go to the right of it Short ("Lune" iconLune) Map Marker
13 "Flying Manor" iconFlying Manor - Central Plaza: Take the left lift up, down the left rope, then go forward and look for a rope on your right "Clea" iconClea ("Maelle" iconMaelle Haircut) Map Marker
14 "Sunless Cliffs" iconSunless Cliffs - Mime Superboss: This is a solo battle "The One" iconThe One Pictos, Bald hair for each character that beats it Map Marker

Defeating Mimes

For the most part, every battle against a Mime is the same, except for the fact they may sometimes have regular enemies with them. That means when you know how to beat one, you can beat all of the others, just bear in mind depending on where you face them, you may take massive damage from their strikes (the final one in "Sunless Cliffs" iconSunless Cliffs for example can hit for around 9,000+ HP per hit).

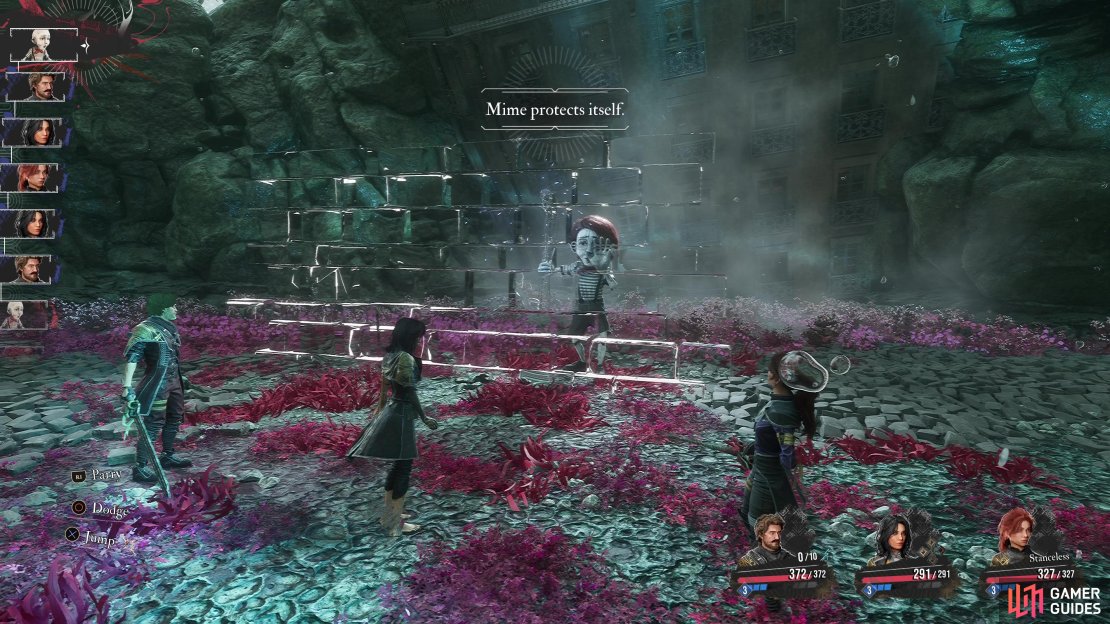
(1 of 3) You’ll need to Break Mimes first before you can start dealing any real damage against them.

Before you do anything else, the first thing you should do against a Mime is look to break them. Their wall they put up on their first turn is incredibly sturdy and until you break it, you’re not going to deal much damage. How much that is varies on the encounter, with the later Mimes having very high Break HP. Once you reach Act 3, there is an incredibly cheap way of doing this very easily by defeating the "Thunder Évêque" iconThunder Évêque on the world map and getting the "Breaking Death" iconBreaking Death Pictos. Couple this with a sacrificial lamb by equipping the "Auto Death" iconAuto Death Pictos and at the start of battle, that character will die and fill the Break gauge.

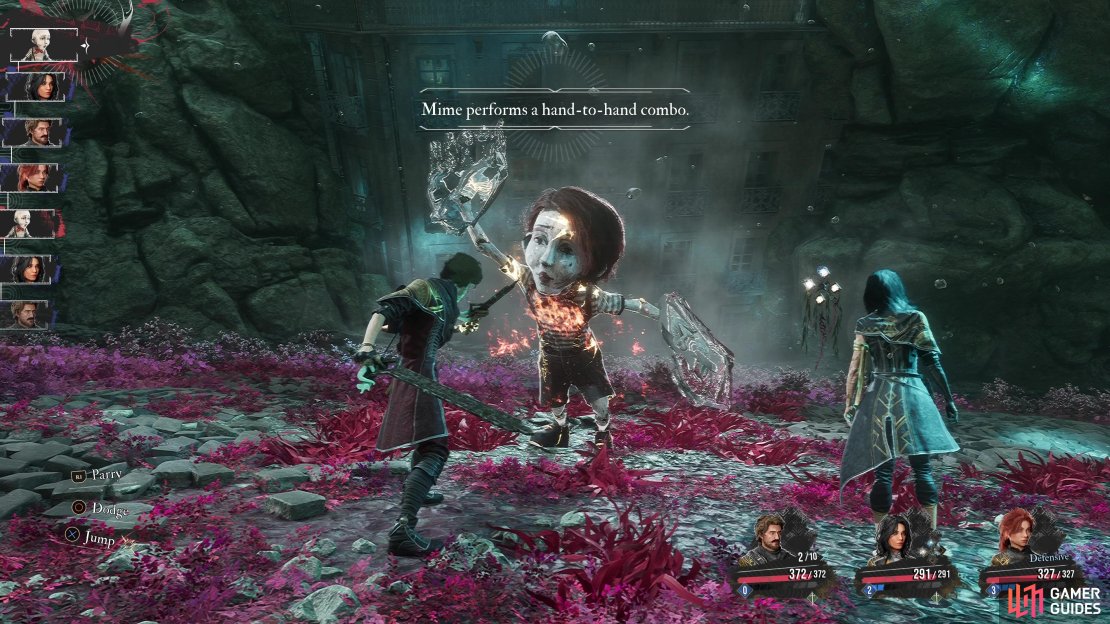
In terms of the attacks, the Mimes have two combos it will use against you. The first, hand-to-hand combo, will see it perform a leaping slap, followed by a second and then a headbutt which has a slight wind up. After fighting these a few times, this is simple enough to Parry and another way you can deal some major damage to it.

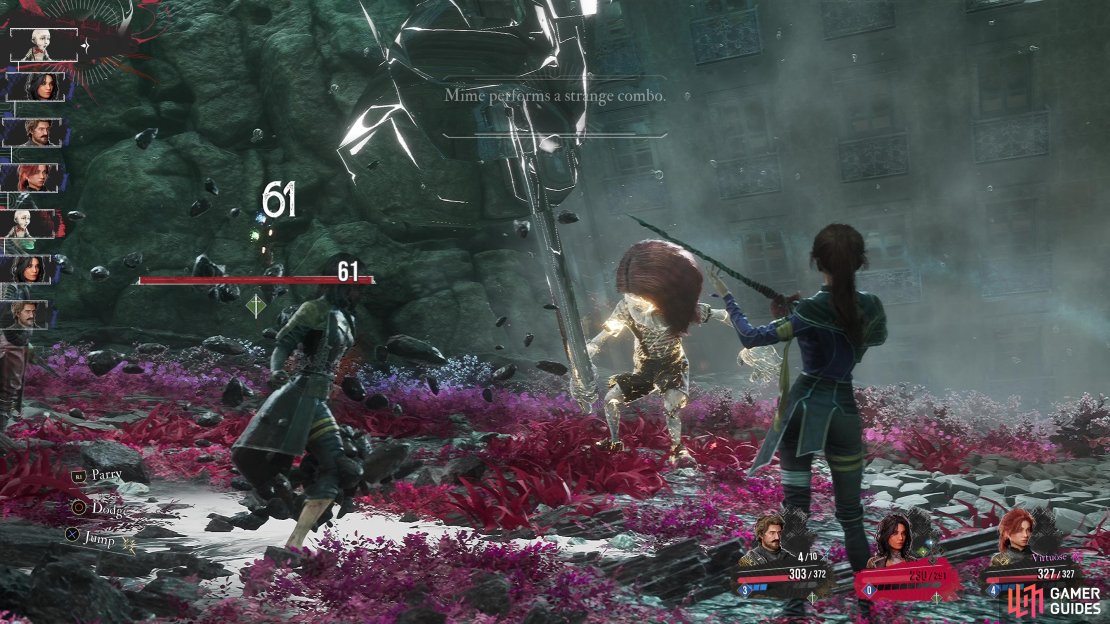
The second combo, named a strange combo, is far more of a concern, as once you reach the later stages of the game, each hit can deal massive damage to you. This will see the Mime summon an invisible hammer and perform four hits with slight delays. That’s all you need to worry for with Mimes, they’ll only ever use these two combos so once you get the timing down, it’s just a matter of dealing enough damage.

No Comments
No Upvotes
User profile pic

Comment submission error:

The comment must be at least 1 character in length.

Guide Information
  • Guide Release
    22 April 2025
  • Last Updated
    28 April 2025
    Version History
  • Guide Author

Share this free guide:

“Tomorrow Comes” - With only one year left to live, join Gustave, Maelle, and their fellow Expeditioners as they embark upon a desperate quest to break the Paintress’ cycle of death. Follow the trail of previous expeditions and discover their fate. This guide will contain the following:

Additionally, you’ll find a fully Interactive Map and database

Pencil icon Sign up

Or

Gamer Guides Premium


Find out more
GG logo

Register to continue…

Already have an account?

Log in to continue…

Forgot?


Account Created

Select username: